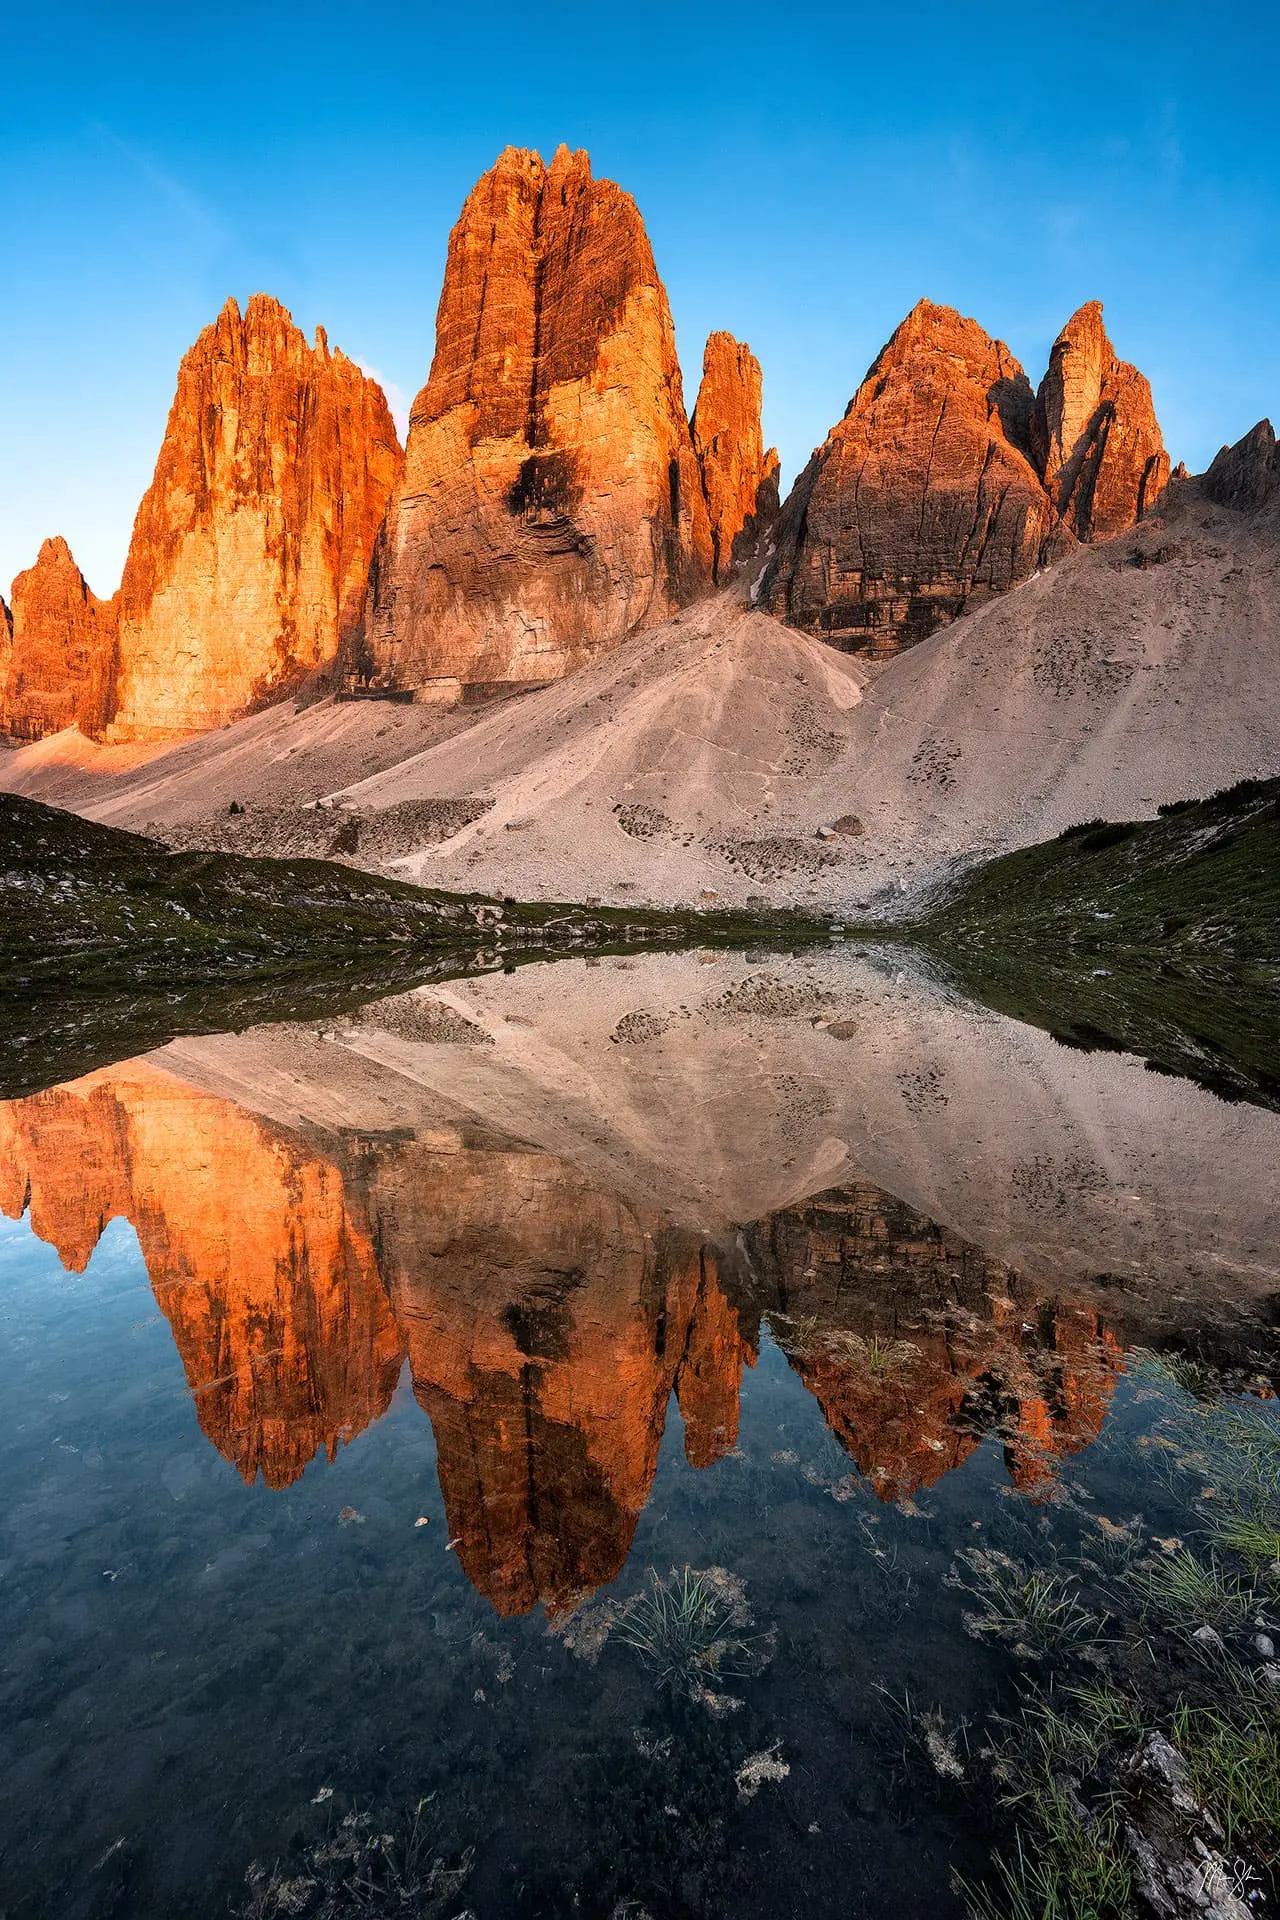
On a recent trip to Europe, I spent quite a bit of time in the Alps. I had some images I planned that I wanted to get, but also hoped for the unexpected moments that can make for some of the best photography! On my first night in the Dolomites, I hiked around part of the famed Tre Cime di Lavaredo. I was hoping to find a pond to photograph a reflection of the towering peaks. I had spent some time researching locations and found a few possible spots that might work for my reflection. Thankfully, the wind was completely calm that evening as well.
After 30 minutes or so of hiking, I arrived at my pre-planned spot. The wind was completely calm, and the iconic towers reflected perfectly in the water below. I waited for some colorful alpenglow to form and set about getting my shot.
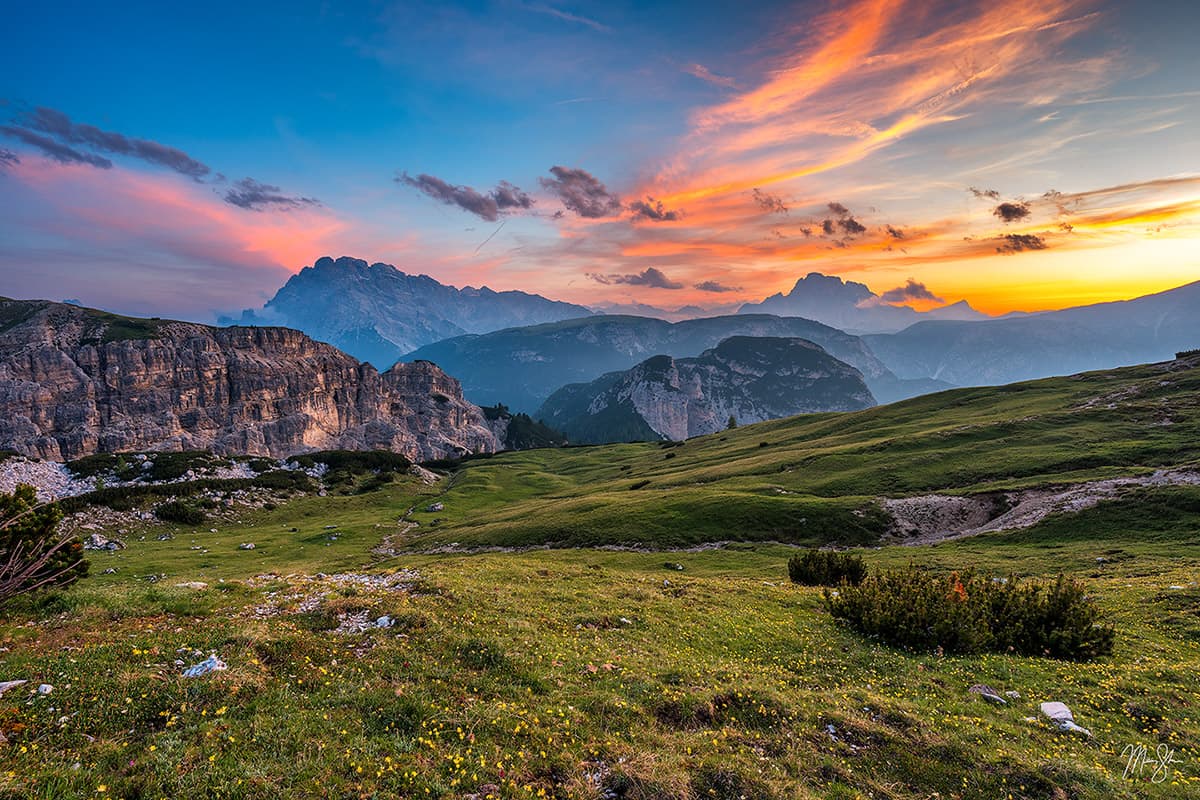
What happened next was even better, though. After packing up when the alpenglow was starting to fade, I figured I would start hiking to see if I could capture another scene somewhere along the way back to the car.
Walking up the hill from the pond I was at, the sky started glowing an ethereal color. As I crested the hills and the expansive view on the west side of Tre Cime opened up, one of the most vivid and colorful sunsets set the sky ablaze! This was one of those sunsets that lasted for what felt like an eternity, changing from warmer colors to deeper oranges and even reds to pinks and purples before blue hour fully took hold and presented its own beauty to capture.
It’s in these unexpected moments that sometimes make for the most amazing images, along with the best moments in nature, that it’s just fun to sit and witness. While I love visiting the ocean and walking through towering forests, or across beautiful grasslands, my favorite subject to capture remains mountain photography. And it’s because of moments like this!
What You’ll Learn in this Guide
In this article, I’ll describe both my own processes of how I approach photographing the mountains, along with the many tools I use, and a bit of inspiration for your own adventures in the mountains.
What to Expect
In the article ahead, we’ll explore a number of topics, including:
- Essential gear for mountain photography, including the cameras and lenses used to create amazing mountain images.
- Planning and preparation, including weather tools, researching maps, and other tips and tricks for timing your shoots.
- Composition techniques such as looking for good foregrounds, testing different focal lengths, and general camera settings.
- Post-processing tips for enhancing your photos.
- Inspiration and real-world examples from famous mountain ranges such as the Alps, the Rockies, and more.
By the end of this guide, you’ll not only know how to photograph mountains, but also how to tell the story you want to with the photography you take.
Note: All the images in this article are mine, and the prints are available on my website.
Contents
Planning and Preparation
One of the most important aspects of a successful trip to the mountains for photography is the planning phase. Before I ever set foot on a trail or jump on a plane for a photography trip, I always invest time in planning.
This involves understanding the landscapes I’ll be visiting, along with the conditions and the timing that will give me the best chance at great images. While I also hope for those magical moments that come from just being in the right place at the right time, planning gives me a chance to be there at that right time.
Virtual Scouting and Location Research
Before I ever pick up my camera, whether it’s a one-day trip or a multi-week trip, I usually do a bit of research on the places I plan to visit. This typically starts with research on the locations themselves.
For certain locations, I might pour over Google Maps for weeks before a trip, looking at different angles of a classic shot to see if I can come up with something a little more unique. Sometimes you can use Street View to get an idea of what a location looks like on the ground.
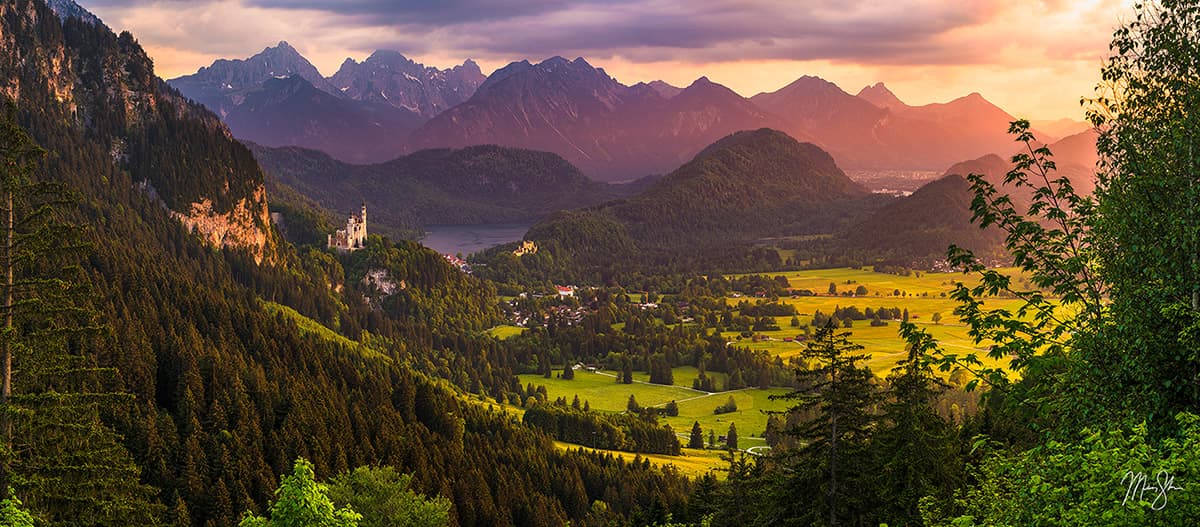
One example of using Google Maps to my advantage was when I was planning a trip to Europe in the late spring of 2023. I had long dreamed of photographing the famous Neuschwanstein Castle in southern Germany. Many photographs are taken from the iconic bridge. But I had found a few photos of it with the mountains in the background that were clearly not from the bridge location.
From my research, a few people would climb a sketchy area that looked to be a bit dangerous to get a vantage point of the castle with the mountains behind it. I didn’t want to go for that, and there seemed to be a lot of regulations surrounding drone usage in the area. So I set off looking over Google Maps to see if I could find a good location to photograph it from. I needed something high enough and in the right direction to get what I was looking for. After weeks of looking at it from different angles and checking street views on Google Maps, I found a couple of spots that looked promising.
When I arrived and hiked up the side of a mountain to get to one of the vantage points, I was floored at how beautiful the location actually was. Unlike the famous viewpoints, the only other people I saw on the trail were locals just out for a run or stroll. It required the use of a telephoto lens, as it was a fair distance away from the castle, but the vantage point included not only Neuschwanstein Castle with the Bavarian Alps as the backdrop, but also Hohenstein Castle, along with the beautiful lake below it in frame as well!
Oddly enough, while my goal had been to photograph the wide scene, I actually ended up finding that the telephoto shot at 400mm ended up being my favorite. I would have never been able to get that angle from anywhere else. Below is the wider angle, so you can see the view I was going for.
In addition to researching locations, if you have the time to physically scout locations, that can be invaluable! Sometimes, just driving down an unknown road can lead to a new composition of a famous mountain in untouched wilderness. It never hurts to spend time exploring for a new perspective.
Researching the Best Time of Year
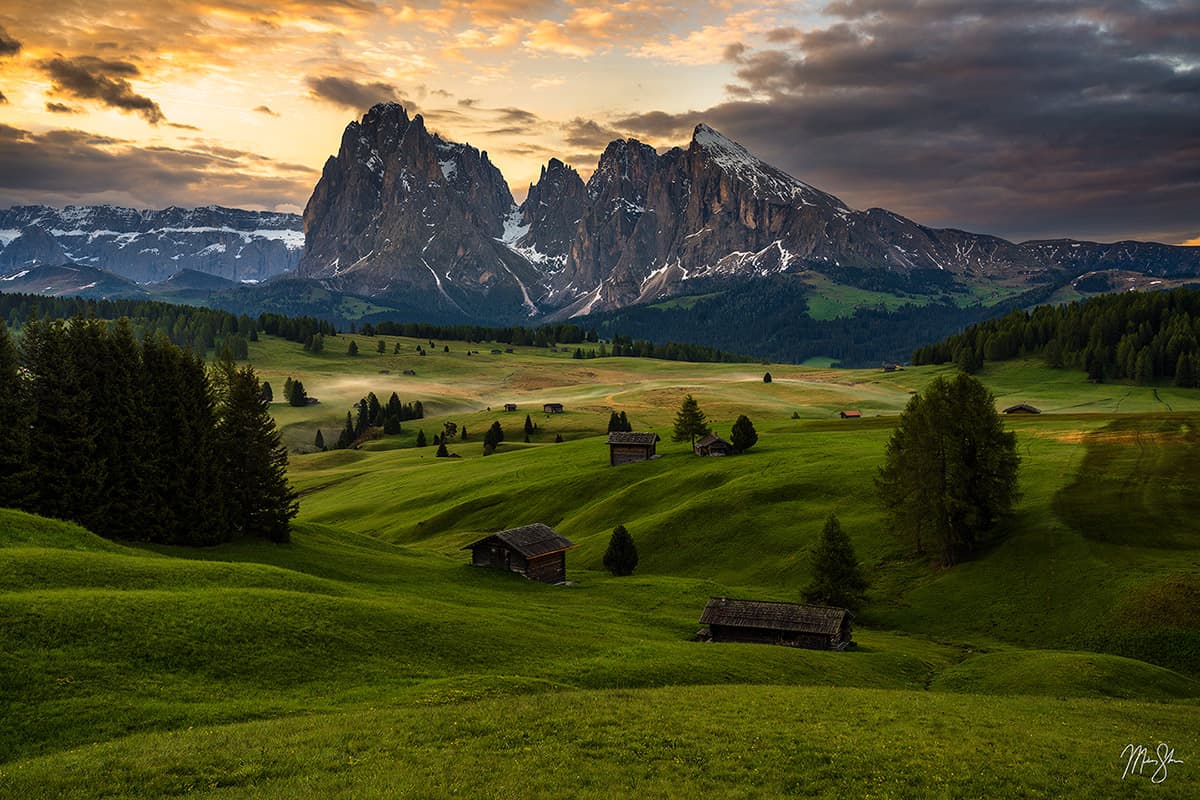
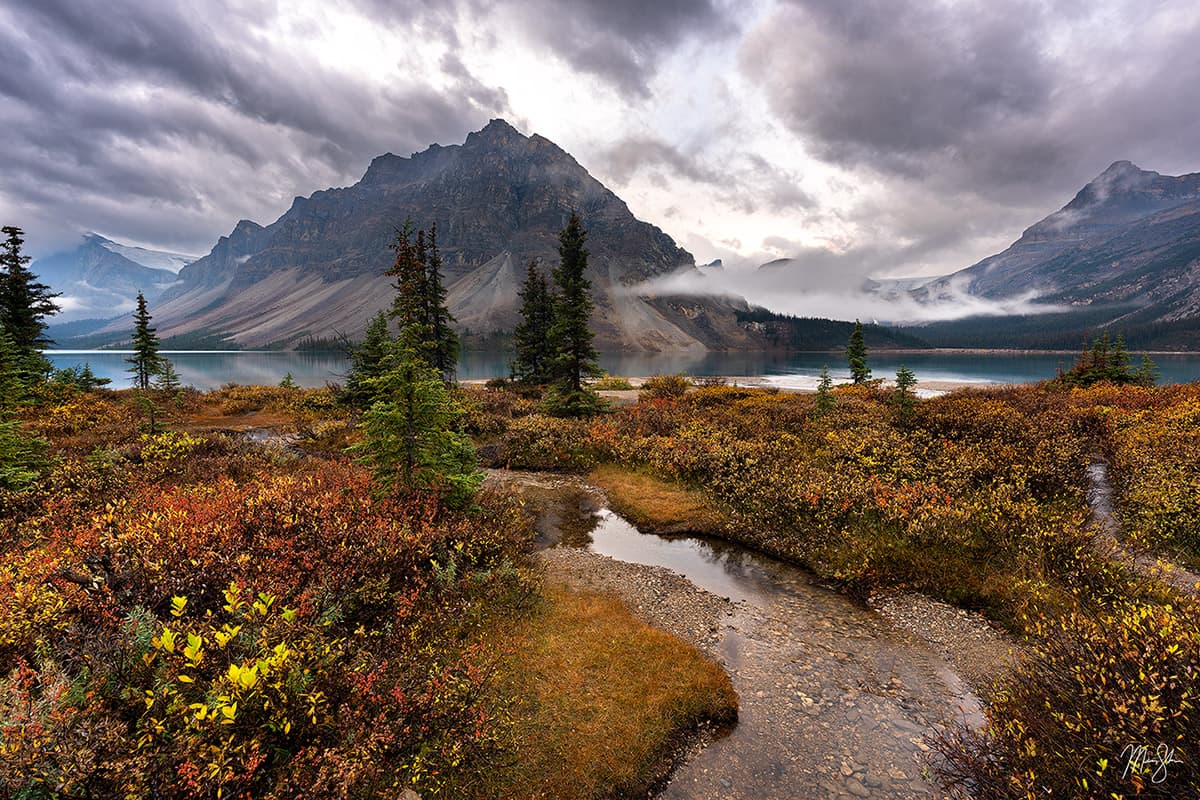
In addition to using maps and scouting, I tend to visit some of my favorite mountain ranges at specific times of the year. There is nothing better than traveling through the Colorado Rockies when the aspens are at peak fall color. Or the Dolomites when spring wildflowers are popping up.
However, sometimes it can be difficult to know when the best dates are. While much of the Rocky Mountains peaks in mid-September through early-October for aspens, larches can turn a few weeks later. However, if you visit Colorado for wildflowers, the lower mountain valleys might peak in June, while the alpine wildflowers at or above treeline might bloom in late July. It helps to get an idea of when things will peak when you are spending quite a bit of money traveling to a mountain location.
The first tool I will use for this is social media. While it’s nice to try and get your own perspective when photographing, so you aren’t just photographing the same thing as others, it can certainly help to look and see when others have visited an area and whether your timing might be good.
When it comes to fall colors, there are many Facebook groups where people post current conditions. As I travel to Colorado to photograph the aspens every late September and early October, I personally follow the various Colorado fall colors groups to get an idea of how things are progressing before planning my drive out. Same with wildflower groups.
Instagram can also be helpful if someone has posted recent photos. You do have to be careful to read through the descriptions and comments sometimes to make sure the photo wasn’t taken in a different year, though. While its popularity has waned somewhat since its heyday of 2005-2010 or so, Flickr can be helpful in seeing how a location looks at any given time of year. Many people posted dates for their photography on the platform. So, to find out when wildflowers are in bloom or fall colors are at their peak in a location, you can search and see what others have experienced in that area.
For example, if you wanted to see when the ice tends to melt off the lakes in Banff, you could look at photos in May and June to get an idea of how the lakes progressed in past years to see when they typically melt and show that stunning blue color they are famous for.
Using Apps and Websites to Help Plan Shoots
Another important aspect of your research is weather. And mountains can be the most unpredictable sometimes. I use a variety of tools to help plan my shoots.
Some of these apps are better suited for checking the night before a shoot. Other apps and websites might help you plan much farther in advance. Here are some of my favorite tools to plan shoots and how I use them:
SunsetWX.com – Within the US and southern Canada, I will usually take a cursory glance at SunsetWX last-minute to see if there is a decent chance of a sunrise or sunset. It gives a decent idea of whether or not there might be some decent color.
OpenSnow – Great for weather forecasting and snow chances in the mountains.
PhotoPills – While it has many features, I use this the most for seeing what angle the sun or moon will rise and set on any given day at a specific location. In the mountains, it can really be helpful to see if the sun will rise or set in a way that lights a mountain up in whatever season you are shooting in. It can also be really helpful for full moon photography, where you might be trying to line the moon up with a famous mountain from a scouted vantage point. PhotoPills also has features for lining up the Milky Way in a physical location as you are scouting earlier in the day.
The Photographer’s Ephemeris – Much like PhotoPills, it can be useful for sun, moon, and night photography. The paid SkyFire plugin can be helpful for seeing how sunrises and sunsets will be over the upcoming days. It’s similar to SunsetWX but predicts sunrise and sunset quality further out, depending on the plan you choose.
TimeAndDate.com Moon Phases – This website is helpful for planning full moon and Milky Way night photography shoots. It can tell you when the full moon will be. It also shows you when the new moon occurs, which is useful for Milky Way and star photography.
Weather.com and Accuweather.com – I will usually take a quick look at both of these sites for weather. They can show different cloud cover percentages, possible wind, rain, or snow, so it’s helpful to get multiple “opinions” on how the weather is shaping up a few days out.
A Final Note on Weather
While it’s great to use many of the apps above, weather in the mountains can be unpredictable. Some of the best photographs can be had when you take a chance on a sunrise or sunset that is looking likely to be a dud.
On many occasions, a clearing evening storm or cloudy morning sometimes opens up for a brilliant sunset or sunrise. I’ve been burned on occasion in the past by going solely off of weather reports and sleeping in when I’ve been exhausted, only to find out the sunrise was fantastic. Likewise, I’ve been blessed with some fantastic light on other mornings that looked almost impossible.
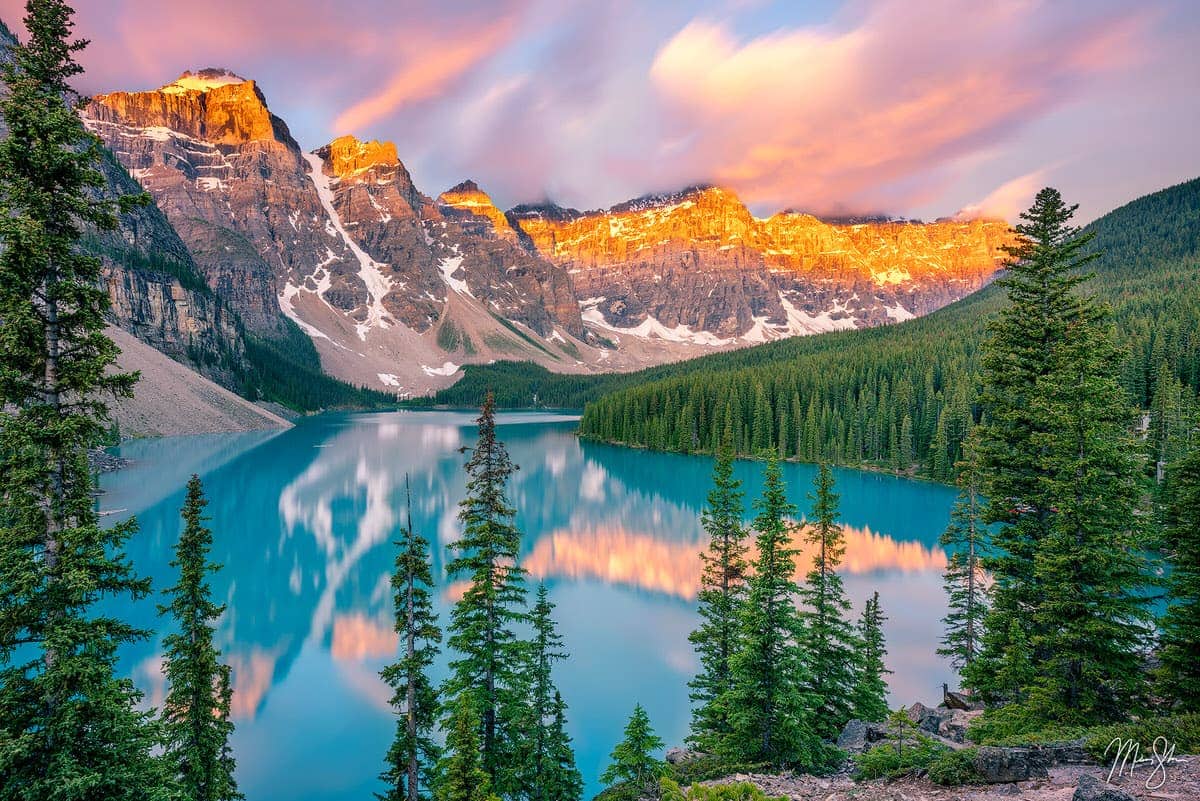
My best-selling image is a sunrise at Moraine Lake in Banff that turned out amazing. I had driven all day and gotten in at 2 a.m. in Banff in June of 2018. With sunrise around 5 a.m. that time of year, I really wanted to sleep in, knowing I had a second morning to work with before heading up to Jasper. But even though the weather wasn’t promising, my gut told me to forgo the sleep. I was rewarded with this beautiful sunrise. The next morning, I went, and it was overcast, cold, dreary, and completely uninspiring. Had I waited, I would have missed out completely.
So take the chance sometimes on those less likely mornings and evenings. You might come away with one of your best-ever images! Especially in the mountains, where the weather can certainly be unpredictable.
Essential Gear and Technical Skills
No matter how beautiful the mountains are, the quality of your images is greatly affected by how well you know and understand how your gear works. While you rarely need the newest or most expensive equipment to create a great photograph, it helps to have the right tools and know how to use them.
This section breaks down the camera equipment, accessories, and other gear that can help you capture those magical mountain moments!
Choosing the Best Camera and Lenses for Photographing Mountains
I think people always hope for a be-all-end-all camera that is best for landscape and mountain photography, but quite honestly, the best camera is the one you have.
Many think you have to chase after the best and newest gear to get great shots, and that couldn’t be further from the truth. Many also get stuck on a specific camera brand. Whether it’s Sony, Canon, and Nikon or Hasselblad, Fuji, and Leica, the truth is, all of the camera brands have some fantastic pieces of equipment.
That’s not to say that finding the right camera for you isn’t important. As someone who primarily sells prints of my photography at large sizes, I tend to choose a camera and lens system that is going to have a higher megapixel count, but also lenses that will resolve at those sizes. My current camera of choice is a Sony a1 II, and I have multiple lenses: 14mm GM, 16-35mm GMII, 24-70mm GMII, 70-200mm GMII and a 200-600 G. This covers most all focal lengths I would need and the camera has a nice sweet spot of great tools and features, along with a higher MP count that take advantage of some great lenses to back it up.
If I were to purchase another camera, it would likely be a medium-format Hasselblad or FujiFilm at this point. But that is only because having the sharpest prints at the largest sizes is what matters most to my photography. For 99% of shooters out there, you can get a great camera at fairly reasonable prices and a decent set of lenses that won’t break the bank. I’ve shot with Nikon and Canon before Sony, and was happy with all of them when I was photographing with them.
Must-Have Accessories and Gear for Mountain Shoots
I’m not a gear-head who brings a lot of accessories and such with me on a mountain photography trip. Too much stuff just gets in the way and clutters my camera bag. The last thing you want to be doing is lugging 100 pounds of gear miles up the side of a mountain. However, there are a few specific items that I always have along on a photography trip.
First off, the most important accessory for me is my tripod. I’ve owned a few. Early in my photography career, I made due with cheaper tripods that worked fine. In most situations, they worked just fine. For the average photographer who’s using a tripod, you can find some decent ones that will work well. That said, I spent a fair amount on a high-end tripod from Really Right Stuff in 2018 that has served me fantastically for many years now. The thing is built like a tank. As someone who sells large format fine art prints, I needed something that could withstand more wind and elements than the average tripod, and RRS makes some of, if not the best tripods and tripod heads out there.
That said, prior to RRS, I’ve used tripods from Manfrotto, Slik, and MeFoto that worked just fine in many situations. I actually still have a 15-year-old Slik tripod as a backup for the rare occasions that I have a second camera setup for some reason.
Moving on to filters, I’ve used a few different brands over the years, but I always seem to go back to Breakthrough Filters. I’ve been happy with my polarizer and ND filters over the years, and recently upgraded to their magnetic filters, which just make it so much easier to take a filter off and on. No more getting a filter stuck on in cold weather. That said, I’ve used a number of other brands over the years, many of which are high quality as well.
In addition to the technical gear, having some kind of rain cover for your camera can be beneficial. If there is a hint of rain in the forecast or I even think I’m going to be photographing a waterfall in the mountains, I usually bring one along just in case.
One final accessory worth mentioning is a cheap but invaluable one. A Giotto Rocket Blower has saved me hours of removing dust after a trip. Mirrorless cameras in particular are notorious for dust on the sensors, so this little $20 gadget has been a great investment over the years. As soon as I start noticing dust spots on a trip to the mountains, I do a quick cleaning with my trusty rocket blower. It won’t always get everything, but it is an invaluable and inexpensive tool worth having in your bag.
I will also usually have a few microfiber clothes to clean lenses as needed. Outside of that, this is most of my kit for my mountain photography trips. As I said above, I don’t usually bring along a lot of accessories unless I need something specific.
Composition and Creativity
Composition is one of the first steps you can take to showcase your creativity. How you compose a scene can make or break a mountain photograph. Crafting an image that can draw the viewer in takes creativity.
Using light, foreground elements, different focal lengths, and strong storytelling elements can transform even familiar mountain scenes into something special. In this section, I’ll cover some techniques to help you bring depth, emotion, and creativity to your work.
Shoot in RAW
If you plan on doing any post-processing, this is a must. Shooting in JPEG leaves you very little to work with when you get back home after your shoot and will limit all but the most basic editing. If you are a serious photographer looking to edit your photos in any way, shooting in RAW is a must for sharpness and creativity.
Creating Depth with Foregrounds
While mountains are certainly impressive in their own right, a photo of a distant peak without any context can still feel flat. You want to aim for telling a story with your photograph. To create an image that is immersive and draws the viewer in, it helps to include a good foreground element.
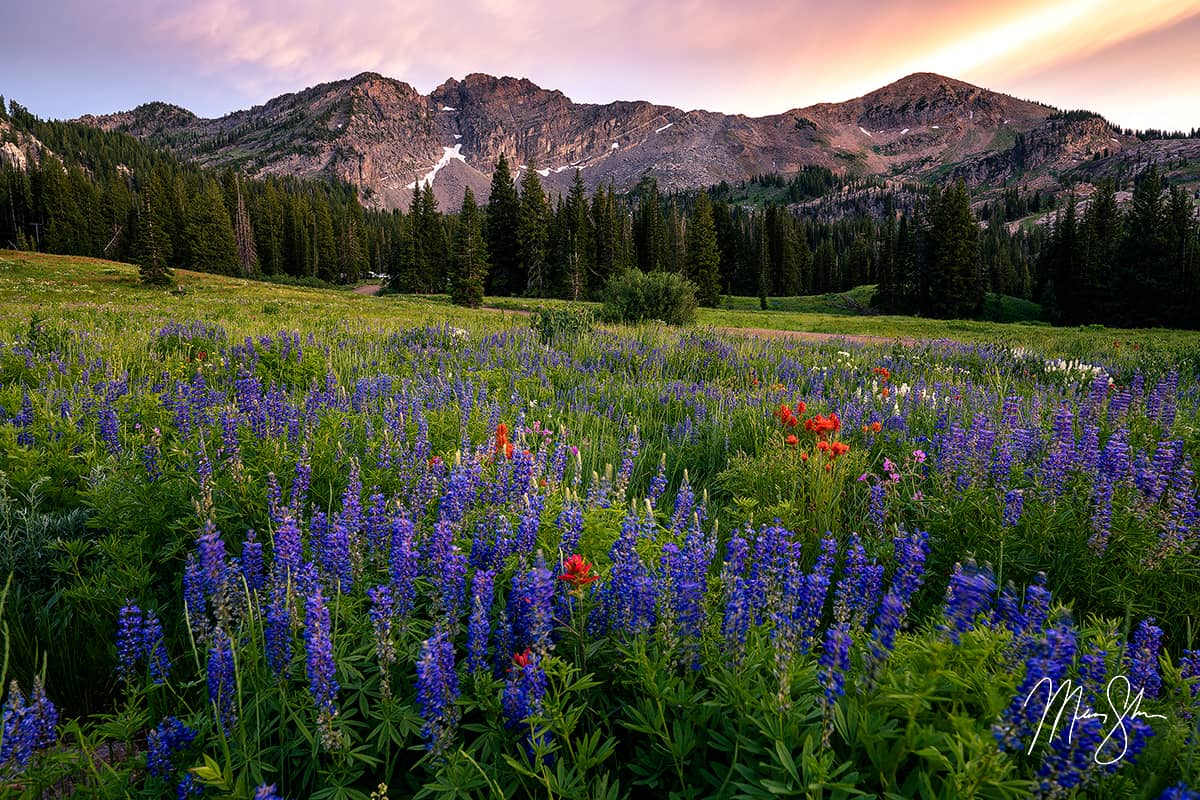
This can be something as simple as rocks or a field of alpine wildflowers. The textures on a few large rocks or boulders can make a subject far more interesting. Likewise, positioning yourself where the most interesting wildflowers are front and center can transform a field of summer alpine flowers with mountains in the background.
As you are telling your story, look for seasonal things that can act as great foregrounds. In the winter, frozen lakes with cracked ice patterns give the viewer a sense of cold that comes with winter in the mountains, while mossy stones in the foreground create an interesting way to tell a story of spring and summer in the mountains. Always be on the lookout for something unique to tell your photographic story in the images you create to make them more compelling.
Using Natural Features as Leading Lines
Leading lines always help as well. Anything from a road that winds its way towards a mountain range, a trail heading to a distant mountain, a glacial stream, or even footprints in the fresh snow can create a sense of depth and tell a better story. Get creative and look for something that would make a good foreground element.
Playing with Focal Lengths and Aspects
One thing that can really help you compose a scene is to take your camera off your tripod and just move it around. See if you can spot a composition that makes sense. If you are working with a zoom lens, try different focal lengths.
I find this helps tremendously when using a telephoto lens. I love photographing mountain peaks during moody weather. Seeing clouds swirl around craggy mountains and how the light interacts can make for fantastic photographs. If I have a 100-400mm one, I might see how the image looks a bit wider, then zoom in on the specifics of the peak to see if there is a much tighter composition.
Also, with newer cameras, the quality of lenses combined with higher megapixels can allow you to crop. Many times, I will come home with some great images, but something is just a bit off. I find that cropping in a bit tighter sometimes can make for a better image. Also, cropping off the top and bottom in some cases can create a beautiful panoramic image in comparison to a standard landscape 3:2 or 4:3 size.
Speaking of panos, if a scene calls for it, I will usually photograph it as a panoramic format that I can stitch together in post-processing. The same goes for a vertical format. Don’t get stuck in landscape format. Experiment and go vertical. If a scene calls for it, I try to shoot it in landscape and vertical orientation.
Mastering Light in the Mountains
Light makes all the difference in the world in separating a dull photo from a great one. Because of the elevation of the mountains, light hits them much earlier in the morning and lingers far later into the evening.
Aim to be in the mountains at least 30 minutes before sunrise and 30 minutes after sunset to capture the range of light the mountains bring. Many photographers pack their bags after the alpenglow fades, but sometimes the soft light of blue hour can be just as magical as the mountains take on a more purple hue.
Likewise, being at a location well before sunrise lets you scout the best compositions before morning alpenglow hits the tops of the peaks and gives you some time to shoot pre-sunrise blue hour as well. This is also when wildlife is most active. You never know when an elk or moose might walk into frame. As they always say, the early bird gets the worm, and this certainly holds value in regards to photographing in the mountains.
One more thing to mention is to keep an eye on the weather. Some mornings will have fantastic fog in the valleys, and if you are up above, it can make for some of the most dramatic scenes, even on a completely clear sunrise. Being in the fog (if it’s not too dense) can make for some truly compelling and ethereal images with mountain peaks popping in and out.
Techniques and Advanced Composition
Having great composition with your photography allows you to guide the viewer’s eye, create depth, and convey emotion. Great mountain photographs aren’t just about being in the right place at the right time, but also about how you use your creativity to interpret the scene in front of you. This section explores ways to elevate your mountain photography using composition and creativity.
Bracketing and Blending for Perfect Exposure
With current camera systems and their already fantastic dynamic range capabilities, often, I find a single shot is enough to work with when processing in Camera RAW or Lightroom to bring out the highlights and shadows while still keeping heavy noise down. But what about when the dynamic range is just too much for a single shot?
In the film and early days of digital photography, people still used graduated ND filters to try to darken the sky and keep the foreground lighter. But with mountain photography, the horizon is not usually flat. That’s why I tend to bracket all of my shots at a few exposure levels. I will then try to pull off what I want from a single exposure, but sometimes when a sunrise and or sunset is just too wide a dynamic range, I will blend two exposures taken from a tripod. One lighter image for the foreground and one a bit darker for the sky. Blending multiple images lets you create a photograph that gets the full range of light and color.
Much like bracketing exposures for higher dynamic range situations, some photographers love to focus bracket. This is especially helpful in forest and tree photography or images where you have really close foreground subjects and distant objects in the background, and want to maintain sharpness throughout. I will be honest that I don’t do a lot of focus bracketing. In fact, when photographing mountains, I almost never use the technique.
I find photographing at a range like f8-f11 with the foreground in focus is sufficient. Even when printing my work at large sizes such as 8-foot wide, I actually prefer that the distant mountains might be slightly softer than the foreground, as that feels more natural to me. But just know that focus bracketing can help when you get into situations where you might be photographing a flower really close with the mountains in the background, and the focal depth just needs a bit more help.
Conveying Scale and Grandeur
Sometimes the camera can flatten mountains in photographs. As I mentioned above, including objects with your mountain scenes can really help show the size of the mountains.
Including a Person or Animal – Whether it’s a hiker on a ridge or a pair of deer that wander into frame in the valley below, including a human or animal in an image can really show the scale of a mountain.
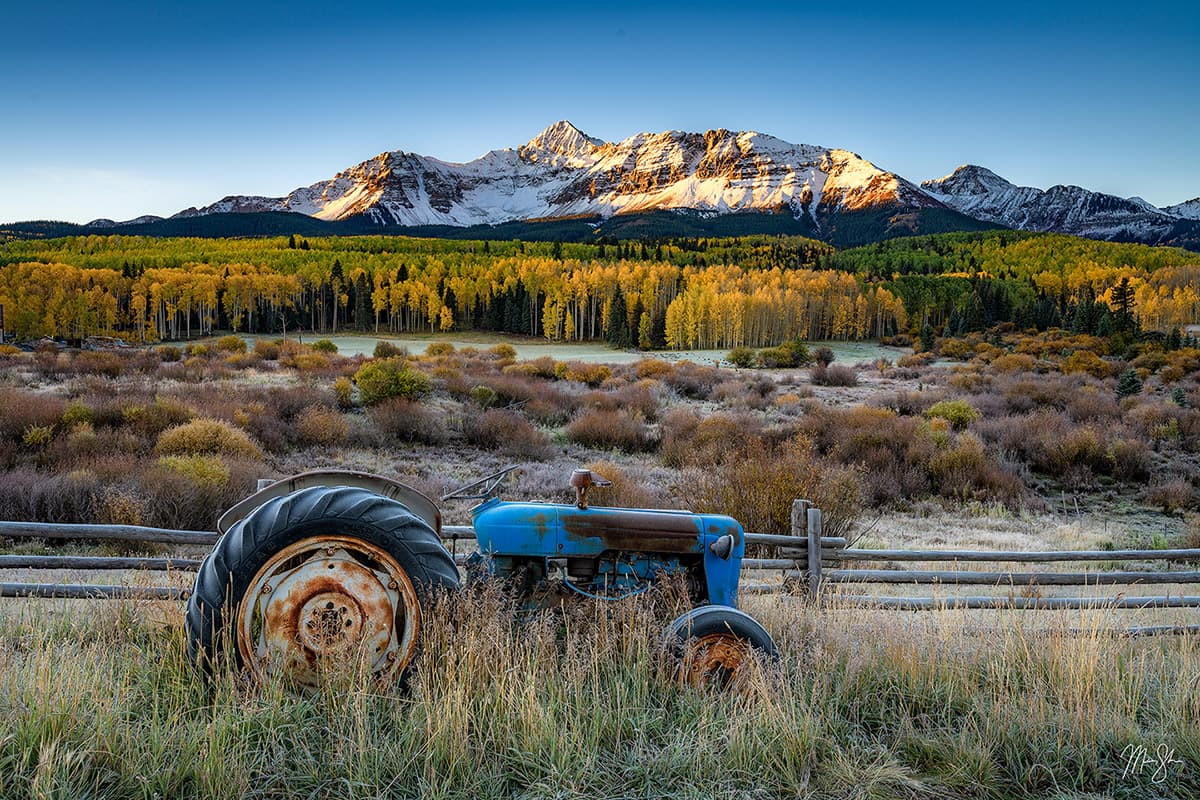
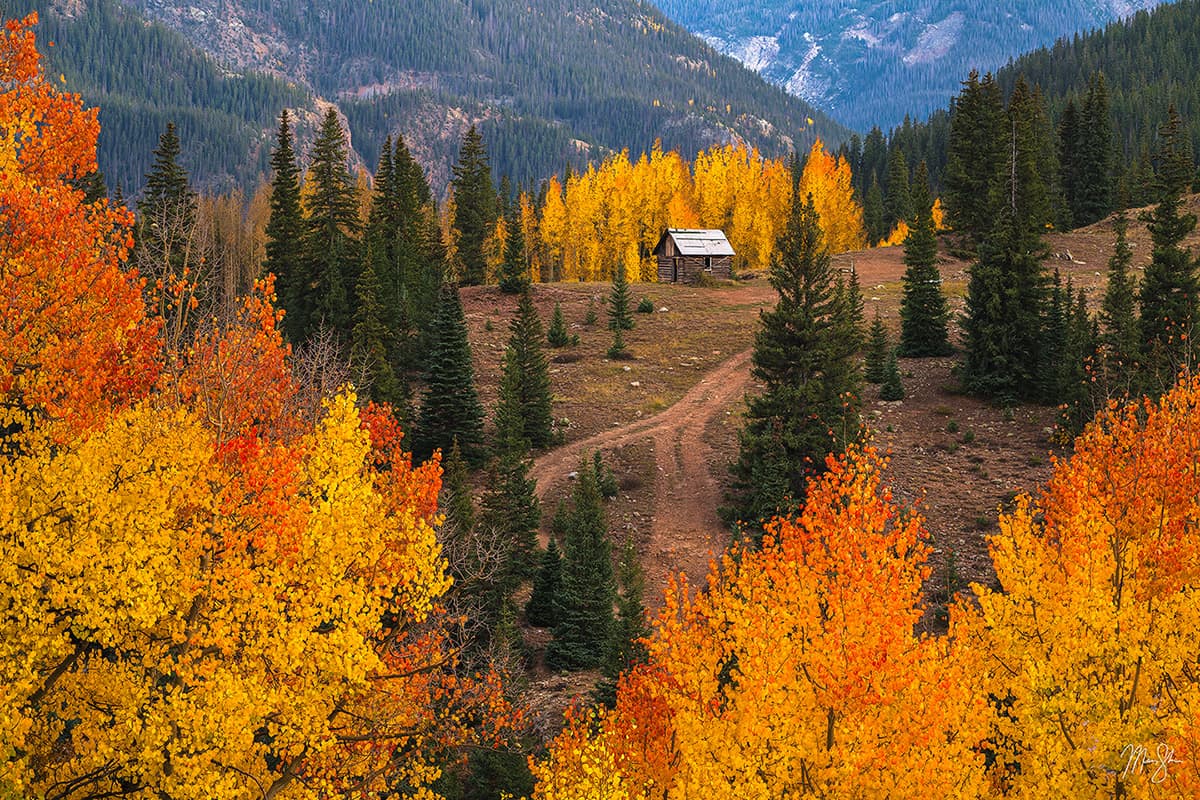
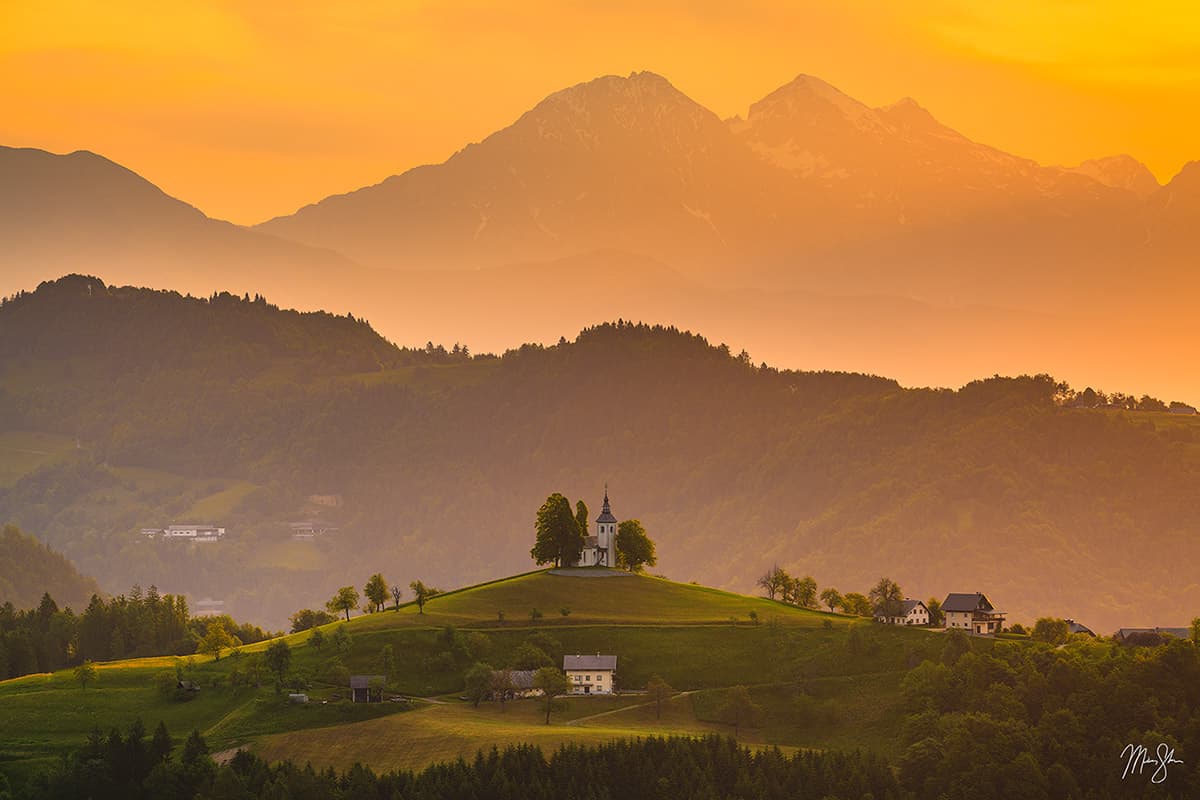
Including a Landmark – While including an elk walking into a valley is awesome, rarely do these moments happen. Look for other landmarks and elements to communicate how big a scene truly is. Whether it’s a cabin in the distance like the famous one in the San Juans of Colorado, pictured below, or an old church in the Alps on a distant ridge, including landmarks can really give a sense of the grand scale of a scene.
Layer Your Composition – The mountains are filled with highs and lows. Foothills, valleys, larger mountains, more valleys, and then the really big peaks. Look for ways to layer your composition where you might have different levels of mountains in the distance that can really help set off the incrementing size of the peaks.
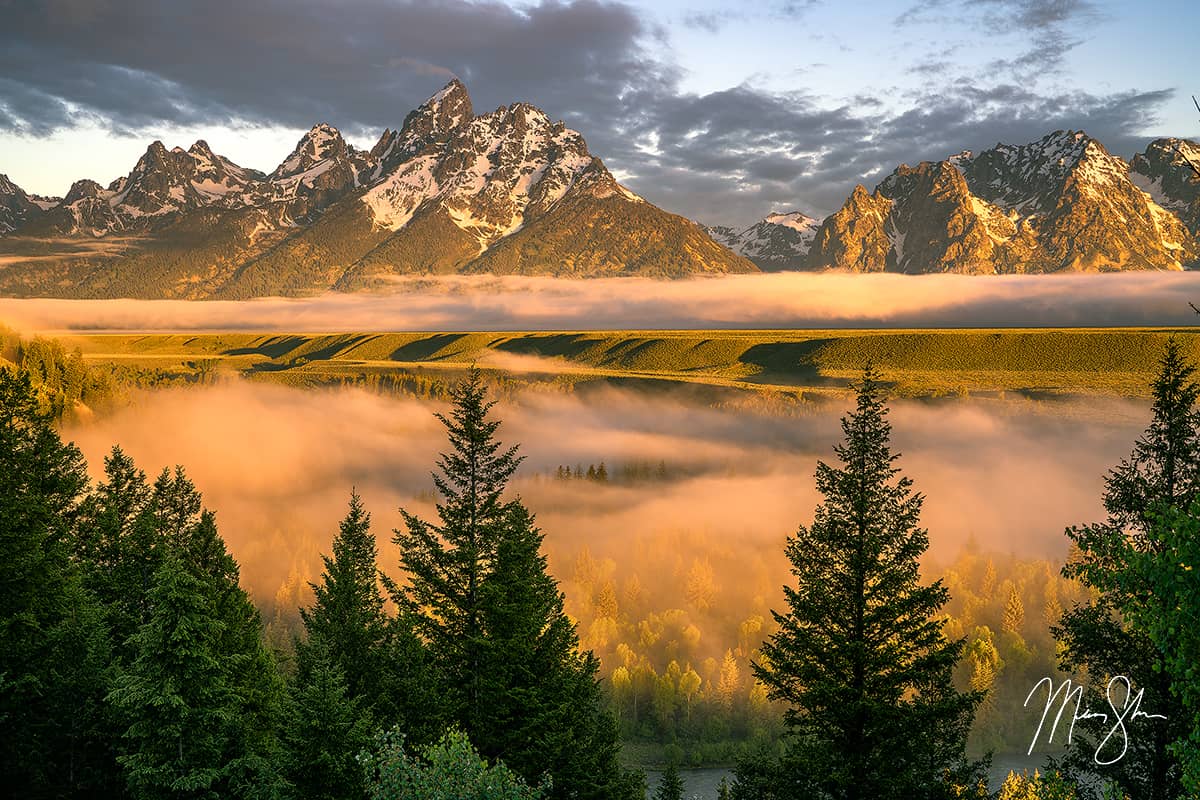
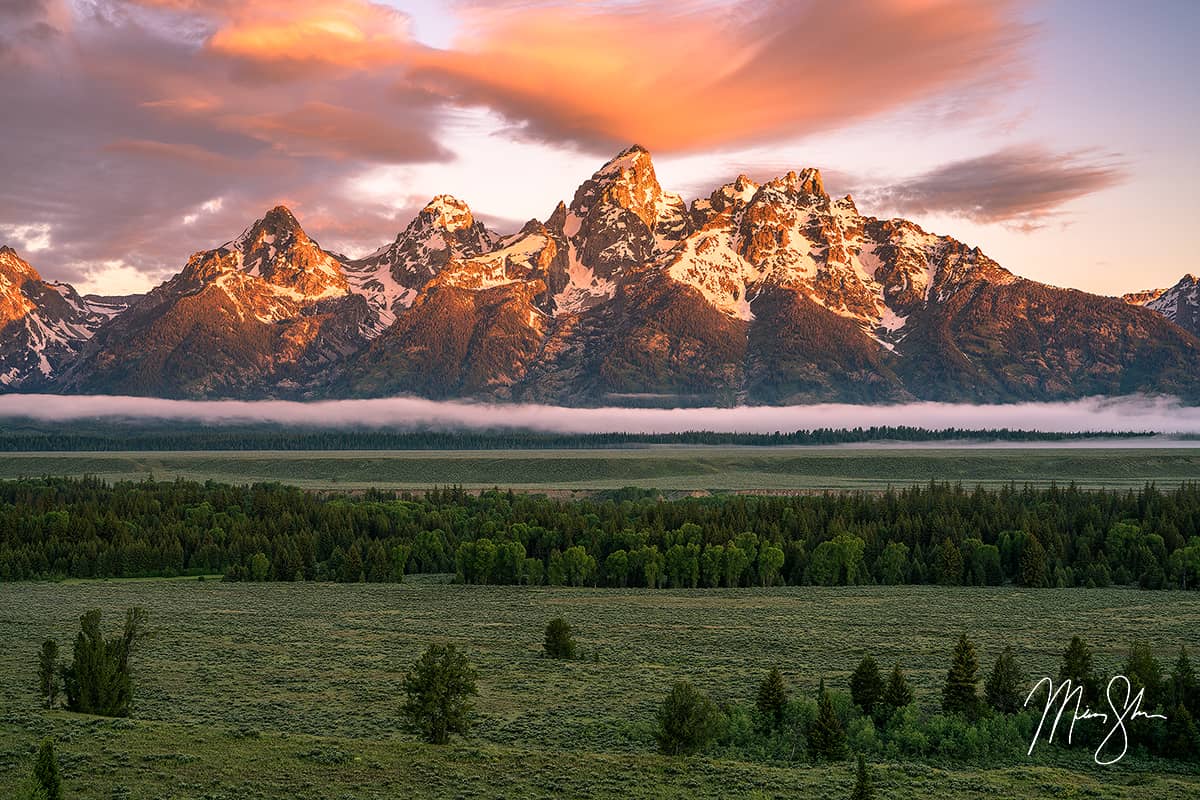
Use Atmosphere – Sometimes, atmospheric events such as fog can help showcase scale as well. Think fog banks at sunrise in the Grand Tetons. In my travels there, I’ve witnessed fog that loves to hang out below the mountains, allowing you to create atmospheric layering in your images and really show the impressive peaks jutting out above the low-hanging clouds. Snow can also be another element. In the mountains, you might be standing in the aspens or valley, and only a few hundred feet up the mountains, a dusting of snow creates a story of the collision of seasons and can really make for a dramatic photograph.
Applying Classic Composition Theories
Even in wild mountain scenery, some of the classic rules of composition can help you to create a beautiful image.
Rule of Thirds – One of the first things you might learn as a photographer is to use the rule of thirds. By off-centering a subject, you create more interest. Placing a subject right in the middle of your photograph can sometimes leave the image fairly boring. Experiment with pushing the main subject a bit to the left or right and a third of the way higher or lower in the frame. Many digital camera systems offer grid features to help you visualize this as you are shooting.
Leading Lines – We have talked about this above, but using trails, footsteps, fences, rivers, and roads can really draw in the viewer’s eyes to a mountain scene. Even patterns or textures in a large rock or the water movement captured with a slower shutter speed can make a strong leading line towards a mountain peak.
Natural Frames – You can also look for things like a tree branch or arching rocks to naturally frame a scene. One classic composition that is always strong is photographing out of a cave-like feature towards the mountains. Including a cave opening or archway to frame a mountain in the distance can make for an amazing use of elements. Think of those amazing photographs you see in Iceland or the Canadian Rockies, standing just inside an ice cave that perfectly frames a towering mountain in the distance.
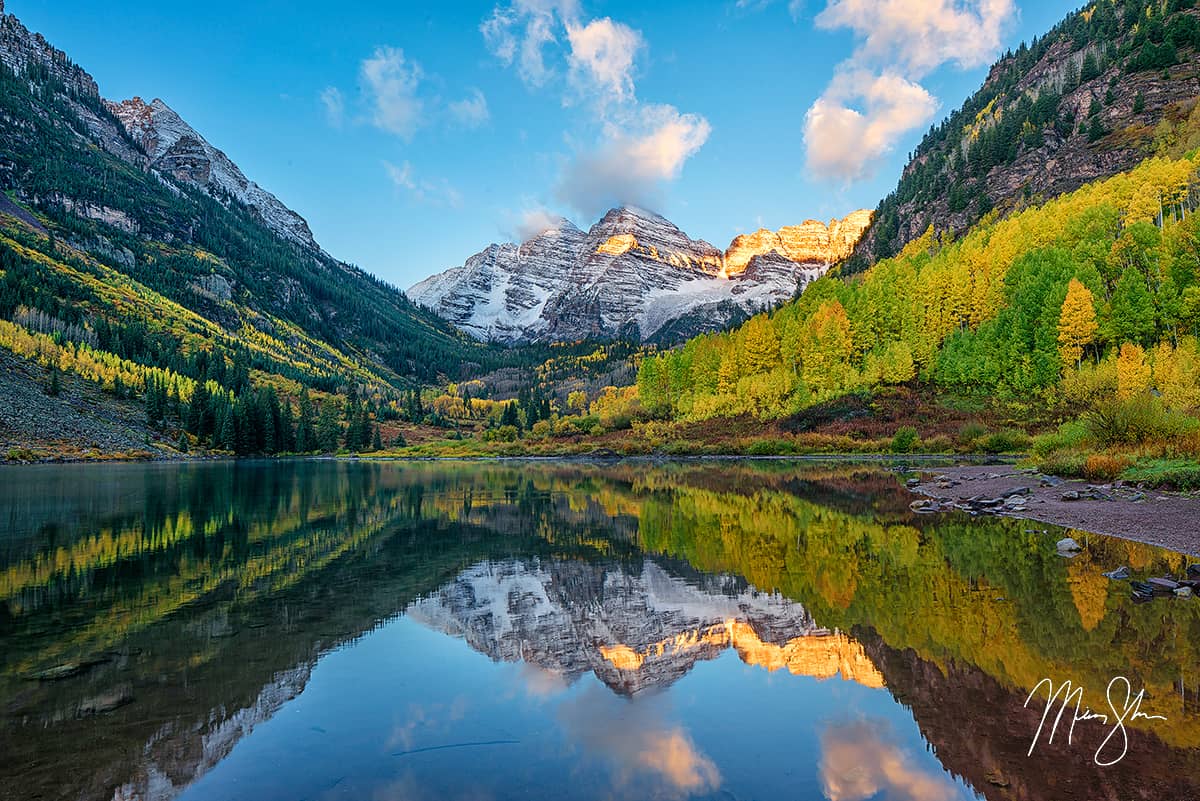
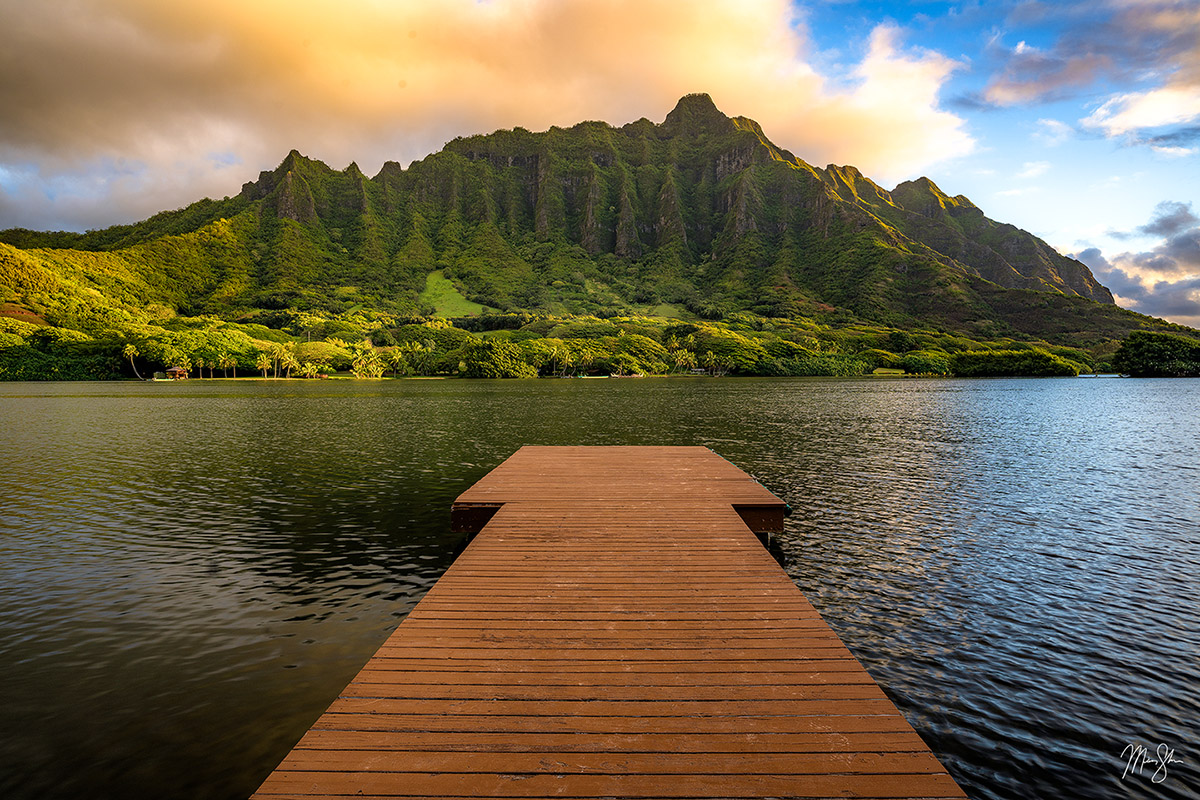
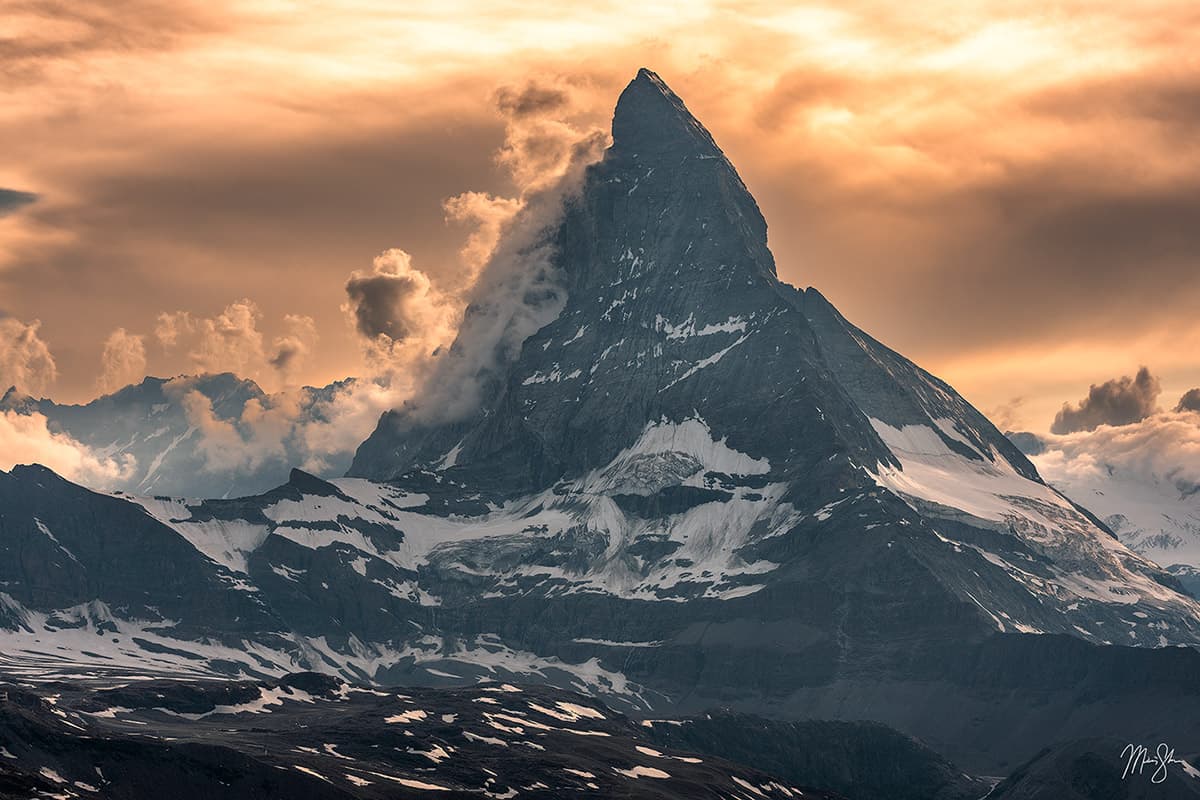
Symmetry and Reflections – One of the most classic compositions in the mountains is when you can capture a reflection in the water below of a famous mountain. Think of the mighty Matterhorn in Switzerland or the iconic and heavily photographed Maroon Bells in Colorado. On days when the wind is calm, usually at sunrise and sunset, you can look for ways to photograph the perfect reflection of the distant mountains in the lake or pond below.
While the classic rules of composing a photograph are important, just know that there are times when they can be broken and still make a fantastic image. Use your creativity and imagination when working with these composition rules.
Telling a Story
One more quick note about composing your images is something I’ve already mentioned multiple times. Telling a story with your photography is what can take a technically “good” photo and turn it into something far more compelling to the viewer. Look for ways to invoke emotion and feeling in your work. If you can invoke emotion from the viewer by using mood, drama, and perspective, your photograph changes from just an image to actual art that makes someone feel something.
Photography Fundamentals
Photographing in the mountains means working with fast-changing light, harsh weather, high winds, and cold temperatures. Even the most beautiful mountain drama and light, or that perfect composition, can fall apart if an image is out of focus or blurry. Mastering your camera settings and equipment gives you control over these elements.
Balancing ISO, Aperture, and Shutter Speed
Using ISO, aperture, and shutter speed is different for each photographer and use. While there are some rules I personally use to start with, I might branch out from what I say below for each setting in different situations. Also, keep in mind that these settings are what I use for my Sony a1 II full frame. If I were photographing with another format, these might change.
ISO – In general, I keep it at 50-100, depending on the camera I’m photographing with. There are times when I will raise it. Ultra-windy conditions might necessitate going higher. Many night photography scenes require a higher ISO to capture enough detail as well. Generally speaking, the higher you go with your ISO, the more noise you introduce into your image. This can be especially noticeable in areas without much texture, such as a blue sky, still water, or even water that has been smoothed out by a longer shutter speed. Moving wildlife will also make me up my ISO to capture the animal without motion in lower light settings.
Aperture – In general, with most scenes, I will start off between f/8 and f/11 to maximize focal sharpness across the scene without making the image too soft. Going to f/1-f/4 is going to narrow your focal sharpness down to a much smaller distance. In portraits, this is often desired to make the face of a person really sharp and let the background be much more blurred. This is something called bokeh and is really desired in that kind of image. However, for a grand scene, we are usually trying to make much of the image in focus, from the flowers in the foreground to the rocky mountains miles away. Going the other direction towards f/20 and beyond makes the scene fully in focus across a larger distance, but will soften the image further.
While the f/8 to f/11 “rule” applies to many landscape scenes, there are other things to consider. When photographing at night, you are likely going to be shooting more like f/2 to get the stars as sharp as possible. On the other hand, if you are photographing moving water like a stream below the mountains, you might want to blur the water with a slower shutter speed. When it’s brighter out, you might have to stop down to f/22 to let in less light and allow for a longer shutter speed.
Shutter Speed – I usually start with ISO and aperture before adjusting shutter speed to where I need it for an image that isn’t blowing out highlights or losing shadows. During normal conditions, the shutter speed can range pretty big depending on how much light there is. Normally, if I’m forced to adjust shutter speed, it’s because of high wind and the need for a quicker shutter speed to keep the tripod and camera from shaking. Or if wildlife is moving in the scene and I need a much quicker shot, I may adjust the shutter speed to a really fast setting.
With wind, a shorter shutter speed, such as 1/100s, will usually allow me to capture a fast enough shot to keep the camera system from shaking as the shutter is firing. And on the other end, if I’m trying to smooth out water, I may try to move the shutter speed slower to half a second or more. This usually requires me to tinker with aperture or even ISO in some cases to get the desired effect.
If you want a broader view on settings for outdoor scenes, check out our detailed guide on camera settings for landscape photography.

Achieving Sharp Images
Use a tripod – While I know some people feel more comfortable photographing without a tripod, and I do understand the freedom of moving around without it, a tripod is your best friend for battling movement, wind, and the ability to use slower shutter speeds and maintain a sharp image. Light gets darker at sunrise and sunset, and oftentimes, you will be photographing with your shutter speed at half a second or longer.
Eliminating Camera Shake – Even on a tripod, manually pressing your finger down on the shutter is going to shake the camera/tripod for a short period. Using a remote or cable trigger can help alleviate this. However, what I personally do is set my camera on a 2-5 second timer for most wider-angle landscape images. For tighter telephoto compositions, such as close-ups of a mountain peak, I might even up that to 10 seconds.
Balance Your Settings – As we talked about above, make sure you are adjusting your aperture, shutter speed, and ISO to achieve the sharpest image possible in your shooting conditions.
Blending Settings
Much like with exposure blending and focus blending, you can also blend different shutter speeds and apertures to help with image sharpness or some other desired effect. I will often photograph scenes with moving water at both f/11 and f/22 if needed, and blend the f/22 scene that has blurred water with the f/11 scene that includes all of the non-moving elements to get everything as sharp as possible while allowing the water to have the look of motion.
Or in a scene with the Milky Way, I might photograph the foreground and mountains at blue hour with my tripod at f/11, then wait for the stars to come out, and photograph it again at f/2 to capture the sky, then blend in post-processing, keeping the scene true to how the sky would look, but allowing me to capture a sharper and more detailed foreground and mountains.
Post-Processing and Editing
Post-processing is not only where your mountain images come to life, but also where you can put your personal touch on your images, from technical edits such as recovering shadows in the mountain valleys or enhancing alpenglow on a peak to how you edit your photograph into a more natural style or a dramatic, hyper-real approach. This is where you can put your creative vision into reality.
Here are some of the best software programs you can use:
- Adobe Lightroom – Powerful RAW editing software with excellent catalog management. Possibly the most popular software out there for photographers.
- Adobe Bridge – A file browser and organization tool that works within the folders on your hard drive rather than using Lightroom’s importing and cataloging. It lets you preview your RAW files and other formats, apply ratings, keywords, batch renaming, and opens files directly into Camera RAW and Photoshop.
- Adobe Photoshop – Photoshop is where most people fine-tune their individual images after doing all of their Camera RAW (or Lightroom) adjustments. It has a host of advanced workflow features and is where you might do most of your blending (exposure, focus stacking, etc.). It can be used for masking, cloning, upsizing, final sharpening work, removing distracting objects from an image, and more. This is where you can really get in and do fine-detail work on your image to finish it off.
- Adobe Camera RAW – Basically Lightroom without the catalog feature. Both are built on the same engine with the same capabilities.
- Capture One – Known for exceptional color rendering (especially in blues and skin tones). Offers layer-based editing, tethering, and precise color grading.
- PTGui – While Lightroom and Photoshop handle basic panoramas, PTGui is more ideal for complex mountain panoramas. It allows for better control over alignment, distortion, and projection.
There are many more software and plugins, such as DxO PhotoLab, Topaz, Luminar, and more, that do various things, but I can only really speak to the software I use. For my own personal workflow, I start in Bridge, opening RAW files into Camera RAW and making most of my substantial adjustments in a non-destructive workflow. I then take the image into Photoshop to do any final touchups (cloning out people, upsizing, various sharpening methods, etc.).
I rarely use Lightroom personally, as I don’t do a lot of batch editing. Occasionally, I will use PTGui for stitching some images together for a panoramic format shot if needed.
Basic Editing
My basic editing flow finds me raising the lights slider under the Curves panel in Camera RAW, then doing some adjustments to blacks, whites, and highlights sliders under the Light panel. This gets my shadows and highlights at a much better balance. Sometimes I will raise the shadows if needed, but it can add more noise that becomes much more noticeable in smooth areas of an image. After that, I work on my white balance if needed.
From there, I play with the contrast a bit until I’m fairly happy with it, sometimes doing some small tweaks to the luminosity of individual colors. I generally try to expose to the right when photographing, so I may also pull the exposure slider down slightly if I need to darken the entire image a bit. I don’t usually touch saturation and vibrancy sliders, as I feel like contrast usually does most of the job for me of getting some punch in my colors.
I then take the image into Photoshop to do any last-minute tweaks. If I plan to print an image, I will upsize it, then do some sharpening methods on the image. This is a very pared-down explanation of my editing, but it covers some of the bigger steps involved to take my image from a flat RAW file to something with a bit more pop to it.
Finding Your Voice with Authenticity
Editing mountain images is a balance between finding your artistic interpretation and respecting the natural scene. There’s no single “correct” way, but you want to find what supports your creative vision. There are so many tutorials, YouTube videos, and such out there that you can usually find something that can help guide some of your editing until you find your own style of what you want your photos to look like.
My personal belief is that both creativity and honesty can coexist. If you choose to heavily manipulate an image (replacing a sky, moving the Milky Way in an unnatural direction, creating a different mood that wasn’t there), that’s perfectly valid as an artistic expression. Just be transparent about it. Don’t try to say the sky was moody with lots of clouds when it was actually clear. It feels misleading and breaks trust with your audience. Creating art is about emotion and expression, but building trust with your views makes that art matter.
Inspirational Destinations
The world is full of incredible mountain landscapes, each with its own mood, weather, and charm. Here are some of the most famous mountain ranges in the world:
Famous Mountain Ranges Worth Photographing
1. Himalayas (Asia)
- Includes the world’s largest mountain, Mount Everest, and 9 of the world’s 10 highest peaks.
- Countries: Nepal, India, Bhutan, China, and Pakistan.
- Key Peaks include Mount Everest, Kanchenjunga, Lhotse, Makalu, Dhaulagiri, and Annapurna. Just doing the Mount Everest base camp is a true feat on its own for any serious mountain hiker.
2. Andes (South America)
- The longest continental mountain range in the world, stretching 4,300 miles.
- Countries: Chile, Argentina, Peru, Bolivia, Ecuador, and Colombia.
- Famous areas include Patagonia, Fitz Roy, Aconcagua, and Torres del Paine. The iconic Machu Picchu is situated high in the eastern slopes of the mountain range.
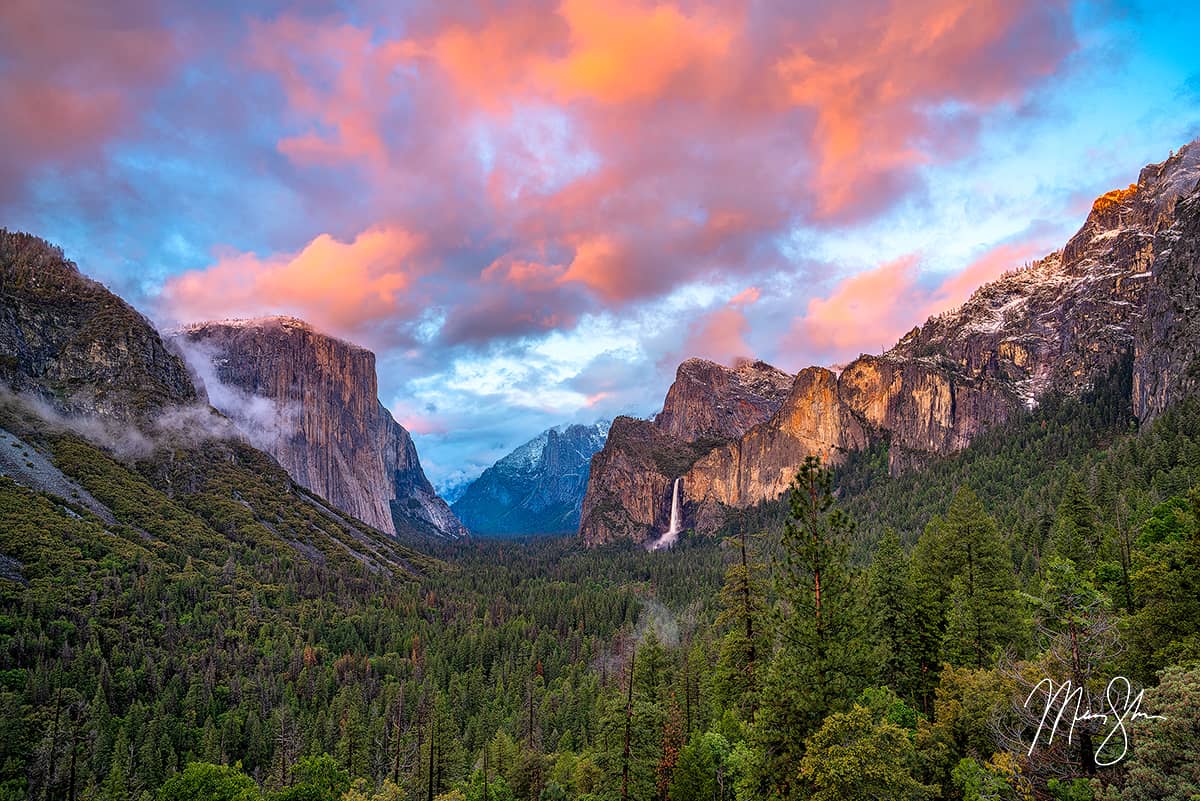
3. Rockies (North America)
- Stretch from New Mexico through Colorado, Wyoming, Montana, up into Canada (Banff, Jasper).
- Countries: USA (New Mexico, Colorado, Wyoming, Montana, Utah, Idaho) and Canada (Alberta, British Columbia)
- Known for the Canadian Rockies (Banff, Jasper, Yoho, Waterton, etc.), the Colorado Rockies, Yellowstone National Park, Grand Teton National Park, Glacier National Park, and many other beautiful regions full of alpine lakes, dramatic peaks, and glacier-carved valleys.
4. Alps (Europe)
- The Alps are considered some of the most beautiful mountains in the world, with iconic famous peaks like the Matterhorn.
- Countries: Switzerland, France, Italy, Austria, Germany, and Slovenia.
- Iconic mountains include the Matterhorn, Jungfrau, Monch, and Eiger. Subregions, including the Dolomites and Julian Alps, present their own beauty. Includes the impressive Jungfrau region with Lauterbrunnen, Wengen, and Grindelwald, along with charming places like Lake Bled and Old World castles, towns, and ancient churches.
5. Karakoram Range (Asia)
- Home to K2 and some of the world’s most dramatic spires and glaciers (Baltoro, Trango Towers).
- Countries: Pakistan, China, and India.
- Famous for some of the most dramatic and demanding peaks in the world, like K2, Gasherbrum I, Broad Peak, Gasherbrum II, and Masherbrum, along with one of the world’s most beautiful drives in the Karakoram Highway that rivals even the Icefields Parkway in Canada.
6. Sierra Nevada (North America)
- Home to Yosemite, Mount Whitney (the highest mountain in the contiguous U.S.), and Lake Tahoe.
- Country: USA (California).
- Famous for granite cliffs, waterfalls, and John Muir wilderness vistas.
7. Cascade Range (North America)
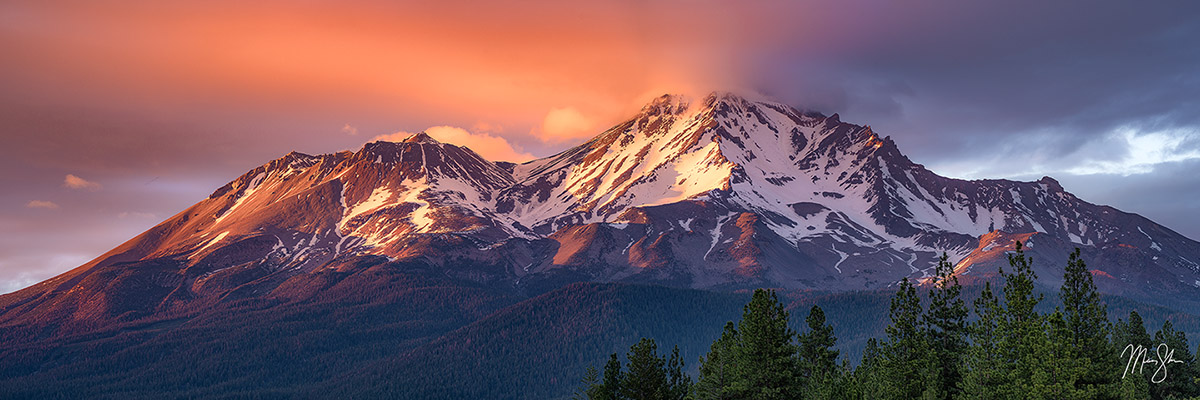
- Volcanic peaks dominate the Cascade Range, such as Mount Rainier, Mount Hood, Mount Shasta, and Mount Baker.
- Countries: USA (Northern California, Oregon, Washington) and Canada (very southern British Columbia).
- Famous for its volcanoes, rugged ridges, glaciers, wildflowers (Mount Rainier is especially impressive), and moody Pacific Northwest weather.
8. Southern Alps (Oceania)
- Dramatic glaciated peaks, turquoise lakes – Aoraki/Mount Cook, Fiordland, Mount Aspiring.
- Country: New Zealand (South Island).
- Famous for dominating mountains with stunning turquoise-blue lakes. The Fiordland of New Zealand is a destination in its own right!
9. Pamir Mountains (Asia)
- Known as the “Roof of the World, ” it is located in the intersection of three major mountain ranges: the Himalaya, the Tien Shan, and the Karakoram.
- Countries: Tajikistan, Kyrgyzstan, Afghanistan, and China.
- Famous mountains include Kongur Tagh, Ismoil Somoni Peak, Ibn Sina Peak, Peak Korzhenevskaya, and Muztagh Ata.
10. Tien Shan (Asia)
- Known as the “Mountains of Heaven”.
- Countries: Kyrgyzstan, Kazakhstan, China.
- Home to massive glaciers and rugged, remote terrain. Famous mountains include Jengish Chokusu (Pobeda Peak) and Khan Tengri.
11. Caucasus Mountains (Europe/Asia)
- Includes Mount Elbrus (the highest in Europe by some definitions).
- Countries: Russia, Georgia, Azerbaijan, and Armenia.
- The Caucasus Mountains are steep, dramatic, and culturally rich. Old churches and monasteries sit on hilltops and in valleys with dramatic peaks dominating the landscape beyond.
12. Alaska Range (North America)
- Features the mighty Denali, which is North America’s highest peak.
- Country: USA (Alaska).
- Other notable Alaska ranges: Brooks Range, Chugach Mountains.
- Famous for many huge glaciers, it is so close to the Arctic. Wild, untamed wilderness with amazing wildlife and scenery. A great place to view the aurora with famous peaks as a subject. Also subject to some pretty extreme weather.
13. Scandinavian Mountains (Europe)
- Countries: Norway, Sweden
- Fjords, dramatic cliffs, and Lofoten peaks with low elevation, but visually stunning.
- Famous for places such as Trolltunga, Lofoten, and Preikestolen (Pulpit Rock), along with the many fjords and dramatic cliffs.
Other Noteworthy Mountain Ranges:
- Hindu Kush (Afghanistan/Pakistan)
- Apennines (Italy)
- Pyrenees (France/Spain)
- Drakensberg (South Africa/Lesotho)
- Atlas Mountains (Morocco)
- Great Dividing Range (Australia)
- Carpathians (Eastern Europe)
- Transantarctic Mountains (Antarctica)
- Ellsworth Mountains (Antarctica)
- Gamburtsev Mountains (Antarctica)
- Watkins Range (Greenland)
- Appalachian Mountains (USA, Canada)
- Coastal Range (USA, Canada)
It’s also worth mentioning that not all major mountains are part of a well-known range. Mount Fuji, Mount Etna, many of Iceland’s mountains, along with Hawaii’s Haleakalā and Mauna Kea, are all stand-alone mountains not part of a traditional mountain range. Many of these mountains are volcanoes as well.
Ethical and Environmental Considerations
When you are photographing the mountains, you have a responsibility to protect and cherish the landscapes you are a visitor to. Often delicate, even the smallest of impacts can have heavy and lasting consequences on alpine environments. This section outlines some key principles for minimizing our footprints as photographers.
Practicing Leave No Trace Photography
Mountain environments are fragile, with alpine meadows and tundra that can be damaged with even a little foot traffic. Some of these areas can take decades or even centuries to recover from being trampled. As a photographer, it is my responsibility to do all I can to keep our natural spaces as pristine as we left them. Here are a few ways you can reduce impact:
- Stay on Established Trails and avoid trampling tundra, wildflowers, and moss.
- Never move or Rearrange Natural Elements (rocks, flowers, branches) to “improve” a composition.
- Pack out Everything. Take your trash with you after your shoot. This includes food scraps, tissues, and biodegradable items.
- Avoid Drone Use in areas that are restricted. Drones are great tools for photography, but know when and where to use them responsibly. They can harass wildlife and birds in certain areas.
- Respect Sensitive Areas. Nesting birds, breeding grounds, wildlife, and restoration areas are sensitive to damage.
Another great resource for being responsible in nature for us landscape photographers is NatureFirst.org. Some of their principles go above and beyond the standard Leave No Trace ideas. Here are the seven main principles:
- Prioritize the well-being of nature over photography.
- Educate yourself about the places you photograph.
- Reflect on the possible impact of your actions.
- Use discretion when sharing locations.
- Know and follow rules and regulations.
- Always follow Leave No Trace principles and strive to leave places better than you found them.
- Actively promote and educate others about these principles.
Showing Cultural Respect
Many mountain regions aren’t just scenic. They are home to indigenous communities, farmers, shepherds, and generations of mountain residents. Here are a few tips to help respect the people of the land just as much as the land itself:
Learn basic local etiquette or phrases in rural Alpine villages or indigenous communities in North America and Europe.
Avoid blocking roads, driveways, gates, and other paths for a photo.
Support local economies by eating local, staying in locally owned lodgings, and purchasing from local businesses. You can also support local guide services and such if you are heading to a location for a workshop or tour of some kind.
Be mindful of sacred or spiritual sites such as churches, shrines, cemeteries, and other places in mountain regions where faith and landscape are deeply connected.
Respect landowners’ rights. In many cultures, going onto private property is disrespectful and can even get you in a lot of trouble. Always seek permission first where applicable.
Final Tips for Success
I hope this article has been insightful and helpful to you and your journey in photographing the mountains. Whether they be weather shifts or ever-changing light, conditions in the mountains rarely unfold as expected. A bit of patience, intention, and adaptability goes a long way to helping create great images.

Patience and Persistence
Great mountain photos don’t always come easily. While you might get lucky on your first attempt at a location, sometimes it can take repeated visits to get the shot. Nature photographers are used to hiking a few miles just to get socked in by clouds blocking the peaks, or even you.
But it’s in those moments that magic occasionally happens. I can think of many times that I nearly gave up because things didn’t look likely for a good sunrise, but got up anyway and was rewarded for taking the chance.
Be willing to wait out in storms or fog or go back to the same location multiple times in different seasons or light until you get the image you want. Being stubborn can be rewarding many times.
Shooting with Intention
Ask yourself a few questions when lining up a shot:
- What story am I trying to tell with my photograph?
- Why does this light matter for this image?
- What emotion does this scene evoke? Am I trying to convey a dramatic scene? Or is it meant to be calming or evoke silence and tranquility?
- Is this the best angle, framing, or focal length to show it? As I’ve mentioned earlier, I will take shots at different focal lengths and try different formats (panoramic, vertical, or the classic landscape view).
Conclusion
Whether it’s chasing fall colors in the Colorado Rockies or finding a unique angle of a hidden gem in the Alps, the mountains are always changing. I hope this article helps you in chasing that next mountain photograph or planning your next trip to your favorite peak. In conclusion, I’ll leave you with a few more favorite images from my mountain photography collection for a bit of inspiration.