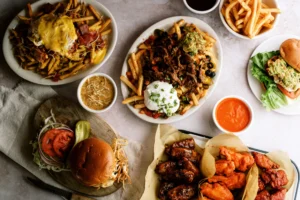
When you’re scrolling through your feed, there’s a great chance you’ll run into a photo of a sweet and sparkling crème brulee, a mile-high loaded hamburger with cheese enticingly sliding down the side, or roasted carrots so beautiful they bring a tear to your eye. (Yes, well- photographed roasted carrots can make even the toughest Bowery bar bouncer reach for tissues.)
By learning how to work with light (daylight or artificial light), some simple equipment, a few flourishes of styling and props, along with composition, you can be on your way toward jazzing up your feed or blog.
So, whether you’re already dabbling in the world of food photography and want to up your game, or if you’re just starting out and are brimming with curiosity, let’s discuss how to photograph food and answer all your questions.
Contents
- Storytelling Through Imagery: Let Your Food Love Shine and Shine
- The Equipment You’ll Become Best Friends With
- Mastering Light: The Key to Delicious Food Photos
- Composition Tips for Eye-Catching Food Shots
- Styling and Props: Enhancing Food Presentation
- Final (Thoughts and) Touches
- Go Forth and Photograph!
- Take Away
Storytelling Through Imagery: Let Your Food Love Shine and Shine
Food photos taken in a small studio or kitchen can evoke the feeling of a warm and cozy Mexican hacienda, a bright country kitchen filled with the aroma of warm chocolate chip cookies waiting for the kiddos to come home from school, or a glitzy night of canapes and cocktails in a metropolitan area.
In those three set-ups alone, you’ve covered the emotions of calm and peace, maternal or paternal love, and the excitement of knowing anything can happen on a Saturday night. Not bad, food! Not bad at all.
The Equipment You’ll Become Best Friends With
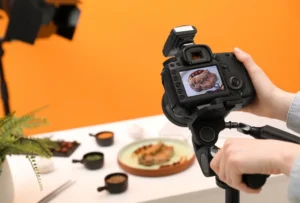
- For the most control over your food photos, you’re going to want a Digital Single Lens Reflex (DSLR), a camera body that accepts interchangeable lenses. That way you can really get in there, and have the food show up the way you want it to with the colors and textures to whet your viewer’s appetites. Hello, Sourdough!
- My go-to is my Canon 60mm f/2.8 along with my Canon 35mm f/2.8. The 60mm can capture a droplet of condensation on an apple like nobody’s business, and makes the colors really pop on – well – everything. My 35mm is fabulous for doing flat-lays and allowing everything from the food to the props to be perfectly in focus. Zoom lenses can work in a pinch, but I’ve found nothing beats the clarity of a single focal-length lens.

Be Your Own Hero: Use a Tripod
One extremely hot August morning (sans air conditioning in the studio), I had the triple-layer ice cream cake carefully sliced, perfectly plated, in wonderful light to be shot handheld. (Somehow, I had convinced myself that a tripod would only get in my way, because I needed to move so quickly because of the fragile subject matter.) Because the cake was melting by the second, I frantically rushed to get the ice cream cake on a platter and the slice on a plate back in the freezer to keep them from deteriorating completely.
After they were safely back in the freezer, I finally looked at my monitor. I mean, it was great light and a shallow depth of field. What could go wrong, right? Every. Single. Shot. Was. Slightly. Out. Of. Focus. Learn from my mistake, especially with fragile foods.
So, sure, you can do some food photography handheld, but it makes more sense just to be best friends with your tripod or other camera stabilizers, so you don’t end up with dreaded “camera shake” (Especially in low light situations). A tripod also frees up your other hand, letting you manipulate your subject, such as pouring maple syrup on a stack of pancakes. Now you’re a hand model too!

Mastering Light: The Key to Delicious Food Photos
How’s the natural light today? Is it dappled with slight shadows falling on your shooting table? Well, well, well. You have the perfect opportunity to transport your dish to a rustic French farmhouse!
Or, if you’d love a more constant light that you can control, you can reach for the LED lamps. Both sources have their attributes and drawbacks.
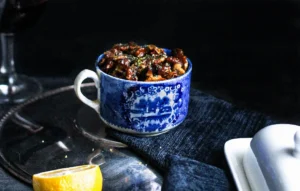
I check the weather constantly like a farmer who wants to get hay cut and in the barn. If a day is going to be exceptionally sunny, I’ll hold off on photographing that lemon méringue pie. If it’s going to rain, I’ll make sure to have the shot assembled and ready to roll when the first raindrops hit the windows. Light like the photo above on the antique library ladder full of ingredients is worth its weight in gold!
With natural light, you are largely at the whim of Mother Nature. And she can have her own thoughts on the way your photoshoot should go. But, is there anything more beautiful than a photo shot on an overcast or (joy of joys) rainy day? The light is soft and lends itself to food photos that look like paintings with texture and subtleties.
But, on a sunny, cloudless day? Well, believe it or not, there can be too much sun. It can wash food out and cast harsh, unfriendly shadows.
However, once you master the tips for LED lamps, you can be the master of your own shooting space!
Making the Most of Your Food Photography Lighting Setup
For about $100-150 bucks you can make your own studio. The things you will need are:
- A diffuser: Place it between the lighting source and your scrumptious looking food.
- A reflector or a “bounce”: This reflects light back on your food and controls the look of shadows.
- The lights themselves: “Soft box lights” are attached to a tripod, which makes it easy to scooch your lighting around.
- Filters: Mama mia! You want a UV filter for your lenses! They protect your lens from breaking, and shield it from food splashes. (We’ve all been there.) They’re also great for fighting off haze when shooting next to windows. Also, a polarizing filter can cut down on unwanted reflections. Think sauces, cocktails, or a pretty glass of lemon water.
Techniques for Optimal Lighting
Sidelights are your friend. Depending on the type of shot you want to take, you may want to bounce light off the ceiling or position lights on either side of your table.
Soft light is glorious, bringing textures and a warm glow to your food—magic! But hard light has its place, too, especially when photographing a large flat-lay with lots of hands and dishes. It’s like a beach party visiting your shooting space.
Using Diffusers and Reflectors: Diffusers are incredibly important for softening bright studio lighting, and allowing the food to shine more than the lighting. Diffusing the light makes food seem “real” and appealing. Reflectors are fantastic for bouncing the light where you want it to go.
Harness and wrangle those shadows: Once you get the hang of working your diffusers and reflectors, you’ll be able to land the shadows where you want them, which can create stunning, dramatic shots that add depth, drama, and – dare I say – a little intriguing mystery to your food. “Look at that pesto pool into a gentle rivulet!”

Composition Tips for Eye-Catching Food Shots
Composition is where the magic happens. How you arrange food in your frame can turn a simple dish into a visual masterpiece. Whether you are playing with balance, different angles, or storytelling elements, composition guides the viewer’s eye and sets the mood of your shot. Let’s go through some essential techniques to help your food photos shine.
Threes Are Your Friends (Part One)
The “rule of thirds” is a photographic technique that allows you to easily compose your shots so the subject is slightly off to the center – which really draws your eyes in and creates movement. Basically, you’re envisioning a grid with two equally spaced vertical lines, and two equally spaced horizontal lines, which creates four intersecting points. Think of placing your main subject – that gorgeous savory scone or that juicy chicken breast – along one of those imagined lines or intersections. Interesting compositions that have movement without feeling chaotic are at your fingertips. Hey, Pretty!
But food styling isn’t always about food composition. Sometimes it’s about letting the food tell its own story. Maybe those berries want to just tumble out of the bowl. Maybe that pint of farm stand tomatoes wants to sit boldly in center frame. It’s food’s world, and we just live in it.
The Impact of Angles and Perspective
I can’t imagine that I am the only food photographer in the world who talks to food. “C’mon, darlin’! Tell me what you want!” And the food invariably will, as you cycle through angles. I was photographing a particularly baffling bowl of cheddar soup that should have loved being photographed overhead (and it didn’t) one day, and it was insanely frustrating. It should have loved it! But then, I switched to a ¾ angle with part of the soup out of frame. And boom! The soup lit up with joy. Angles, my friends. It’s all about the angles.
There’s no way of getting around how important angles are as a tool for telling your food’s story. One of my favorite discoveries in food photography was how much angles change everything. I once took a simple apple and, by getting down low, suddenly it looked giant and majestic, like something from a fairy tale.
Moving higher and looking down lets the viewer peek over the edge of a bowl, revealing the glistening texture of that soup within. An overhead (or flat-lay) shot adds a striking, abstract, graphic quality to many tablescapes.

Flat-Lays
Flat-lays are the ultimate opportunity to treat your shooting table like an artist’s canvas. You get to fill the entire space with fruits, vegetables, meats, herbs, spices, glasses, plates, platters, (and heirloom dishes too!) Arranging all those elements is the perfect time to really play with the “rule of thirds.” Have the small dish of pears be in the center, while the real star of the show – the platter of pears – offset. Play with colors and textures to balance each other out. Fool around with light colors, dark colors, and shadows too. Scatter those herbs and spices, get your hands dirty. Go wild!
One little nugget of advice. Flat-lays are fun to compose, and they’re delightful to look at. But, it’s so, so, so easy to overcomplicate them – and this is a personal problem of mine – falling in love with my props to the exclusion of the subject. “Remember (I’ll say to myself), that antique glass funnel that you found for a buck at the farmers market isn’t the subject. The pickled jalapenos are!” So, having gorgeous props on hand is part of the job. But, remember that using them sparingly is an even bigger part of the job. Flat-lays tell a story, but your props don’t get to monopolize the conversation.

Framing and Cropping
When it comes to framing your photo – again – look to the rule of thirds! It’s a great foundation for taking mouthwatering photos.
Negative space is an artful way to draw the eye right to your plate or bowl of food. Whether in the background, foreground or corner, negative space lets your food pop and gives your styled dish a chance to breathe and bask in adoration.
Styling and Props: Enhancing Food Presentation
Props and styling bring your food photos to life. The right choices enhance textures, colors, and mood, helping your dish tell its story. Let’s find out how to style with purpose.
Everyone Needs a Hero!
Whether it’s that one perfectly ripe tomato standing tall on a bowl full of them, or that one piece of cake where the frosting is peeking out just so, you should have a “hero” in your photograph. Figure out what it is and shoot accordingly.
When there’s not really “a hero” available because of the type of food you’re photographing, that’s when colors can save the day. A brown, monochrome roast loves a blue plate for contrast. A couple of brined pork chops on a blue or white plate will look great having a slightly “soft” (out of focus) bowl of fruit behind it as a color compliment.
Use Your Props Wisely (Rule of Three – Part Deux)
Prop and background selection is one of the most important aspects of taking great food photos. If you’re looking for a dark and dramatic shot, you’re not really going to reach for that piece of white marble. Likewise with your props. If you’re looking for something that’s elegant and rustic, that antique silver spoon with the fabulous patina would be your tool of choice.
Choosing Backgrounds Thoughtfully: There’s a reason so much food is shot with white backgrounds. It goes with everything! But it’s good – and fun – to experiment a bit too. A pale blue background goes a long way, contrasting subtly with food, and works for more dishes than you might think. Also, you can’t go wrong with cream, gray, or faux marble in a variety of nuanced colors.
With textured backgrounds, the world is your oyster! Dark and light wood, metal, subway tiles, multi-hued backsplashes, are all great options. And options are your friend.
Think Minimally
When you think of props, think minimally. Tell your story. Don’t write a treatise. I’ve found a good rule of thumb to be, “Five props. No more, no less.” (To be fair, I don’t always adhere to the rule, but I always keep it in mind!) So, if you’re photographing a bowl of soup, the “rule of five” means you get some napkins, some silverware, a couple of ingredients and a cutting board. There’s your story! “Dang, that soup looks good enough to eat! And there’s a spoon to eat it with!”
Bonus Tip: Also work the “rule of threes.” In this case, if you’re using ingredients as props, just use three of them. They catch the eye. Three tomatoes. Three pomegranate seeds. Three slivers of onion. You get the idea.
And, it’s fun to get whimsical with eco-friendly food props too! Think of bamboo skewers, pine wood food cones as a mini-cornucopia with fruit spilling enticingly out, or even just using brown paper bags with the recycled symbol on them when photographing organic food. It doesn’t hit anyone over the head with sustainability, but it whispers, “This dish is earth friendly and pesticide free.”

Developing Your Unique Style
The best way to discover your own style is just to get into the studio or head over to the kitchen table, and play with props, lighting, lenses, filters, and backdrops. You’ll know who you are in no time!
We think of food laying on a plate as being unmoving. But there’s a lot going on. Whether it’s melting ice cream, or vinaigrette dripping softly off a bitter green, photographing food is a slow-moving action exercise. So, be prepared to shoot, and shoot a bunch. Because, more often than you’d expect, that time that tomato topples off a salad and lands on the table might be your favorite photograph ever.
When it comes to critiquing your own work, you’ll really discover what you like best simply through the editing process. When you’re looking at the 325 photos that you took of one recipe, the ones that are right will jump out at you as “right.” But, it’s always good to get feedback from trusted sources. Your best friend, your spouse, a parent, a child. Just don’t expect someone to critique your entire portfolio when you whip it out over coffee. Give people a head’s up that you’d love their help at a set time.
Finding Inspiration
Finding inspiration is as easy as turning our phones on. Whether it’s Instagram or Pinterest, you can always find someone who makes you want to run and grab your camera!
Different areas of inspiration can come from almost anything. Seeing a beautiful building, “That column looks just like tubed pasta!” To fashion, “Look at how that dress drapes! I could mimic that with a napkin!” My constant source of inspiration comes from our CSA basket in the summer/fall. The tomatoes, cucumbers, garden-cut flowers, corn, greens, all literally make me grab my camera and document the subtle changes during the growing season. Ingredients are the biggest inspiration.

Final (Thoughts and) Touches
Speaking of wonderful things that grow, don’t forget the flat-leaf parsley and cilantro as finishing touches on a dish! They bring a fresh appeal to cooked food that’s irreplaceable. (Similarly, but a titch more cuisine-specific would be dill, basil, oregano, and tarragon. And, don’t forget ground spices either! You’d be amazed at what a couple of grinds of black pepper can do to jazz up a plate of mashed potatoes.)
Captions for your images can be a fun way to delve deeper into the story you’d like to tell. If your grandmother gave you her favorite tzatziki recipe, give her a shout out!
Go Forth and Photograph!
Over the years, I’ve learned that photographing food isn’t just about the right lenses and props, it’s about passion. Every shoot teaches me something new, and I still get excited whenever I capture the perfect lighting or a beautifully composed shot.
If you love food and photography, you’ll never run out of inspiration! Speaking of inspiration, check out food photographers on social media and take mental notes on what stirs you about their work. Start your own account, interact with like-minded people, and share pics and tips.
You can also join a community of like-minded people who would love to share their wisdom. Also, we’ve recently launched a food photography prime class by Michele Lee, so once you have joined, you can explore everything and access the class here. The world is waiting for you!