Learning how to read a histogram can be intimidating. Surely it’s better just to ignore it. But what the histogram tells us is worth the effort it takes to learn about it. Applying that knowledge takes practice, but it pays off with better images.
Therefore, this article will guide you through the what, why, and how of histograms:
- What the histogram tells us
- Why it’s important
- How to use that information
What is a Histogram?
A histogram is a graph that shows frequency distribution. With attention to photography, it’s a bar graph that conveys data about your photograph. In fact, it helps you determine if an image is underexposed or overexposed. Also, it’s helpful in making adjustments to brightness, contrast, saturation, etc.
Access the Histogram
If you’re unfamiliar with how to display the histogram, check your camera’s owner’s manual. Most digital cameras can display a histogram. Many of the newer cameras offer histogram in live view, so you can evaluate the histogram while you’re composing the image and before snapping the shutter.

On some cameras, live view of the histogram requires use of the LCD. Others display it in the electronic viewfinder.
The Histogram Demystified
When you first start using this bar chart called a histogram, it may not make sense. But with practice and a basic understanding of the graph, you gain insight into image luminance and distribution of color.
How does learning to read a histogram improve your photography? In brief, you immediately see if the highlights are blown out, if you’ve lost detail in the shadows, and how much information is in the middle. What’s more, you get better in-camera results. Also, you also get better results in processing.
What a Histogram Represents

This image shows a simple luminance histogram. The graph displays the 255 tones along the x-axis, beginning at zero, which is pure black on the left, to 255 or pure white on the right. Photos produce a histogram with graph peaks and valleys across the horizontal line.
Luminance and Color in Histograms
Histograms typically taper off at the ends. A solid stripe at either end indicates clipped tones and lost detail. Some photos contain a lot of dark or light shades, so most of the information is on the left side or right side. How the middle section looks will vary with the image.

The luminance histogram represents brightness, an excellent way of telling if the image is overexposed or underexposed.
The RGB histogram illustrates the red, green, and blue colors. A histogram displays saturation along the horizontal axis. If the majority of pixels are to the right, it indicates saturated colors. If most of the pixels are at the left, it means more muted colors.
The peak of the curves measured by the vertical axis indicates the number of pixels in the image.
The Ideal Histogram
A histogram that looks like a bell curve, with a peak in the center and gently tapering to both ends of the scale, might be considered the ideal histogram, or the perfect histogram. However, this is a misconception that we should clarify. A histogram is merely a graph representing the distribution of pixels generated by light captured by the camera. Photographers work to create better images, not the perfect histogram. The histogram serves as a tool for the photographer.
Light and Dark in Histograms

The image above is an example of how highlights are displayed. In this case, most of the data from this image is displayed to the right of the histogram.
The picture has good detail, especially in the bird’s body, and in the sky.

In another example, a photograph of nighttime fireworks has most of the histogram information on the left side, in the shadows and black area.
The sky is pure black. But there is good detail and tonal quality in the burst.
Your Conditions May Vary
Both of the above photos demonstrate correct exposure for the conditions, with good tonal values and dynamic range. And although they’re different, each one is a good histogram.
Understanding histograms and applying what they show helps the photographer capture the available light and avoid an underexposed night sky or blown highlights that turn a cloudy sky pure white.
Sharpen Your Histogram Skills
The histogram is not ipso facto the final determination for evaluating the exposure of your photographs. Indeed, that depends on a number of factors, not the least of which is the photographer’s creative reasons.
Learning how to read a histogram is a valuable skill. Histograms show the brightness levels and tonal values of the photo. Use it to uncover clipped tones in the highlights or shadows to avoid loss of detail, adding depth to your image and suggesting context.

The photo of the bridge above is correctly exposed. It has good detail in the clouds, also in the darker foreground, and there is a range of tones. All the pixels fall within the black and white extremes.
A photo of the same bridge is shown below, but this one is overexposed and shows the pixels bunched to the right.
Detail in the sky is lost.

The third photograph of the bridge below is underexposed. It shows the pixels clustered to the left side.
As a result, the sky is an unnatural shade of blue, and some detail in the shadows is lost.

Histogram in Post-Processing
Here’s something to keep in mind. The camera’s histogram makes a jpg version of the image. For photographers who shoot RAW will have a greater dynamic range than what is represented on the camera’s histogram. However, when you load your images into your post-processing software, you’ll see the full range of the original RAW image.
The photo below shows the rich colors of sunrise over a tidal marsh, along with another image showing its corresponding histogram of the RAW file in Lightroom.


Expose to the Right?
A technique used by some photographers is to set the camera’s exposure slightly toward overexposure, to the right on the histogram’s center. This is a little tricky because going too far to the right will blow out the highlights.
Using this information, push the peaks to the right by reducing shutter speed or opening up the aperture. However, be careful to push the exposure just a couple of stops, putting most of the image data into the lighter tones, highlights, and white area.
In post-processing, compensate by reducing exposure. The resulting image will contain more information with less noise in the shadows, enhanced tonal quality, and reduced posterization and artifacts.
Maximize Image Quality
How does a minor overexposure increase image quality? It decreases noise and creates a tonal range with smooth transitions. An increase of brightness in the dark sections of the photo results in banding and noise. This happens when you try to increase detail in the shadows. But not so much when you reduce the highlights.
The Why
The answer is going to venture into engineering territory, so stay with me.
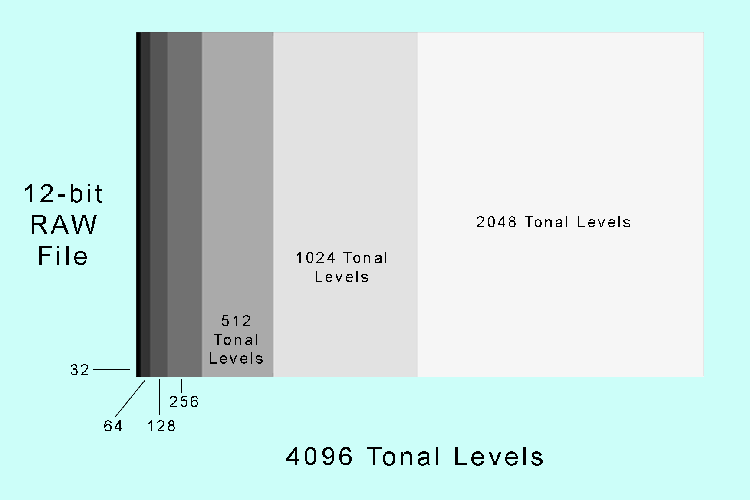
A modern digital camera shooting raw images at the 12-bit rate has a dynamic range of seven f-stops. Each f-stop captures half the light of the previous stop – going from white to black. It’s logarithmic.

Shooting 12-bit raw files, the camera’s recording capability is 4,096 tonal levels. As shown in the above graph, we have 2,048 tonal levels at the brightest f-stop. Significantly, that’s half of what’s available. Going down one stop we have 1,024. Down another stop is 512, etc.
As digital information moves from white to black along the histogram’s x-axis, the camera’s light-capturing capacity decreases with each stop. So, we take advantage of the camera’s encoding ability by exposing it to the right section of the histogram.
Minor Adjustments
A word of caution: when exposing to the right, we’re talking about minor adjustments. In the two photos below, the example on the left shows the camera overexposing by about two stops. The second example may have blown out the highlights. It’s difficult to tell from the LCD image. But the histogram makes it clear.


Not for all Situations
Exposing to the right is not for all types of photography. It’s cumbersome when you’re shooting sporting events or wildlife. But it can work to your advantage for landscape, portraits, or long exposure photography.


Expose to the Wrong
Of course, some photographers will tell you that exposing to the right is all wrong. It’s easier, they say, to pull details out of the shadows than to recapture details in the highlights. And there’s something to that. However, noise lurks among the dark pixels. And exposing to the right runs the risk of blowing out the highlights and being unable to recover the lost detail.
Find what works for you as you try to achieve that perfect exposure.
Why This Matters
Histograms tell us what we need to know about exposure. So the value of using the histogram graph is creating an image with less noise, greater detail, and better contrast. In addition, when we expose to the right, we can use higher ISOs and keep image noise to an acceptable value.
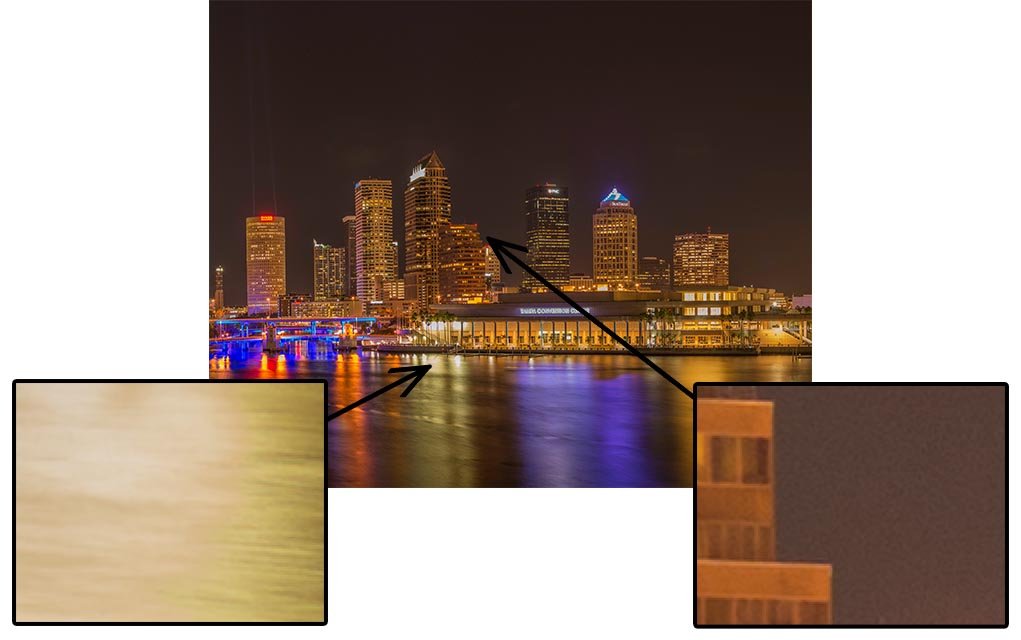
The image below of a nighttime cityscape illustrates the noise issue. The magnified detail of a highlight section at lower left shows low noise. The identical sized detail at lower right taken from the shadows is noisy.

A Scientific Measurement
Histograms give us a scientific measurement of what the camera is seeing. It is the best available data of an image’s exposure, a graph of how the pixels are distributed. When you go into post-production you’re equipped to get the most out of that data and create photographs of the best quality.
In Conclusion
The modern digital camera is a sophisticated device. And learning how to read a histogram is just one of the skills that a photographer needs.
The camera’s LCD is unreliable for checking exposure. It’s good for focus and composition. But the brightness setting of the LCD may not be in synch with the brightness of your photo. So check the histogram.
When it comes to post-processing, the histogram proves its value no matter what software you use. Histograms point you to where adjustments should be made. And understanding histograms can help you get the most out of your camera’s capabilities.


Fantastic explanation. Easy to understand, with plenty of information
I’m not a particularly tech photographer but histograms are something I always take a look at, especially if I’m in a very strong natural light.
thanks Daniel for this insightful article.