You can make wonderful professional looking slideshows in Adobe Lightroom. This is a great feature that many people are not even aware is a module included in the software package.
The lightroom slideshow module makes it easy to create customized slideshows. Once you’ve finished, you can export your slideshow lightroom file as a video or PDF. You can then share your slideshow video on Youtube or any social media platform. The PDF can be used on its own or incorporated into a Powerpoint, Keynote, or similar style of presentation.
Even if you’re not inclined to share your photos, making a slideshow in lightroom can boost confidence in your
Using the Library Module and the Develop Module in lightroom it’s easy for you to miss seeing your best images. Going through your portfolio of photos and picking out the ones you like the most can help you develop a positive attitude about your pictures.
Maybe you have a good impression of your work and are confident in it already. That’s great. But it’s also rather uncommon, unfortunately. I know many photographers who struggle to see their photos in a positive manner. Taking time to make a slideshow in lightroom can help you because you’ll see your best photographs displayed professionally.
I use Lightroom Classic and this is what I am writing about in this article. The lightroom CC slideshow module seems to be more limited.
Choosing Photos for Your Slideshow
To create your lightroom slideshow you first need to select a collection of images you want to include. Deciding how many images you will use influences the length of your slideshow and how long each photo will be displayed. You have control over this and I’ll explain more about how to manage the duration later in this article.
Think about who you want to show your slideshow to and where you will present it. You might be making a slideshow of the best photos you’ve ever taken. You might confine your selection of images to those you made during a specific event, like a child’s birthday party or your last vacation.
Having some kind of unifying theme running throughout your slideshow will help hold the viewer’s interest for longer. Take time to consider this as you pick which photos you’ll include.
I often make a quick first selection and include more photos than I know I’ll use in the final slideshow. Doing this allows me more flexibility when I come to curate the photos. Having more photographs to choose from gives you better options. Considering which photos look good placed next to each other in your sequence is easier.
Step by Step
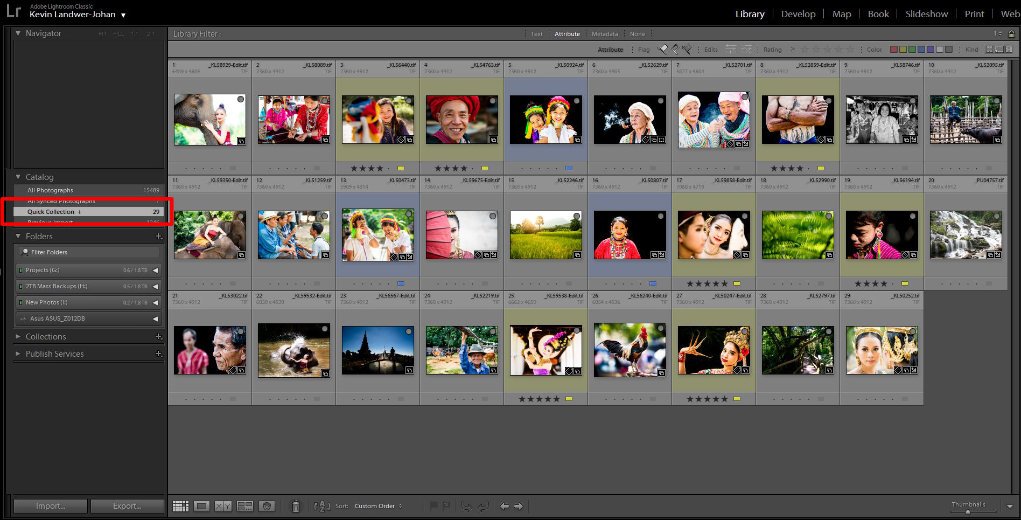
In the Library Module, select the Grid view. Now you can browse your catalog of photos and begin choosing the photos you want to include in your slideshow. Adding each photo you choose to a Quick Collection by clicking on the image and hitting the B key is the best way I know to do this.
Once you have all the photos you want to use selected, make a new collection. This allows you to keep track of the images you are working with for your slideshow. Select all the images in your Quick Collection and then press Ctrl + N (Cmd + N on a Mac). Give this new collection a name and it will then be added to the Collections Panel to the left of your main lightroom window.
You can continue to add or remove photos from your collection as the slideshow project comes together.

Curating Photos for Your Slideshow in Lightroom
This next step in making your Adobe slideshow is as important, if not more important than choosing the photos you want to use. Placing your photos in order so they are pleasing to view and flow in sequence makes for a more interesting slideshow.
Without careful consideration, your lightroom slideshow might appear as an unrelated collection. This random order is not likely to hold anyone’s attention for long, unless you’re a world class photographer. You want to make sure your photographs look good together.
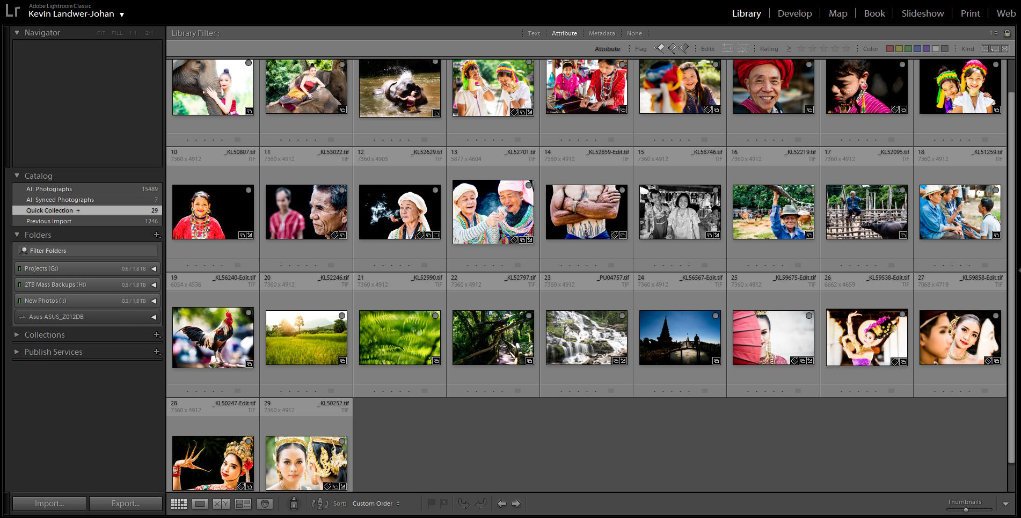
Two Guiding Choices
There are two things that will guide you in creating a good sequence of images when you create slideshows. The first is the story you are telling. What are you wanting people to see from the whole collection of your photos when you create a slideshow? This is a very different process than presenting your photos individually.
The other consideration when you create slideshows is how images placed before and after each other look together. This has a lot to do with the content of individual photos. Are there similar colors in the photos you are placing next to each other? Is your main subject to the left or the right of your composition? Are there people in every photo? Also, think about how you are placing vertical and horizontally framed images.
Does the collection of photos you are using to create a slideshow follow a natural progression of events? If so, you’ll probably be best to make sure the sequence of events if unbroken, or at least appears to be natural.
If you’ve photographed a wedding and are making a slideshow you’ll be best to arrange your photos along the same timeline that they happened on the day. Don’t start with the bride throwing her bouquet or the cutting of the cake. These events normally happen nearer the end of the day. Start at the beginning and progress naturally through the series of events to tell an effective story with your photographs.
Take your time to arrange your selection of photos so they look good in sequence.
Build Your Slideshow
Now that you have your images laid out how you want, it’s time to start building your slideshow. Click on Slideshow Module in the top menu. This opens a new module interface with different left and right panels.
Near the top right of the screen in the slideshow module, you will have an option for creating a new slideshow. Click on this and name your slideshow. From the location drop down below this, choose where to save your slideshow. Once you have saved your slideshow all future changes you make will automatically be saved.
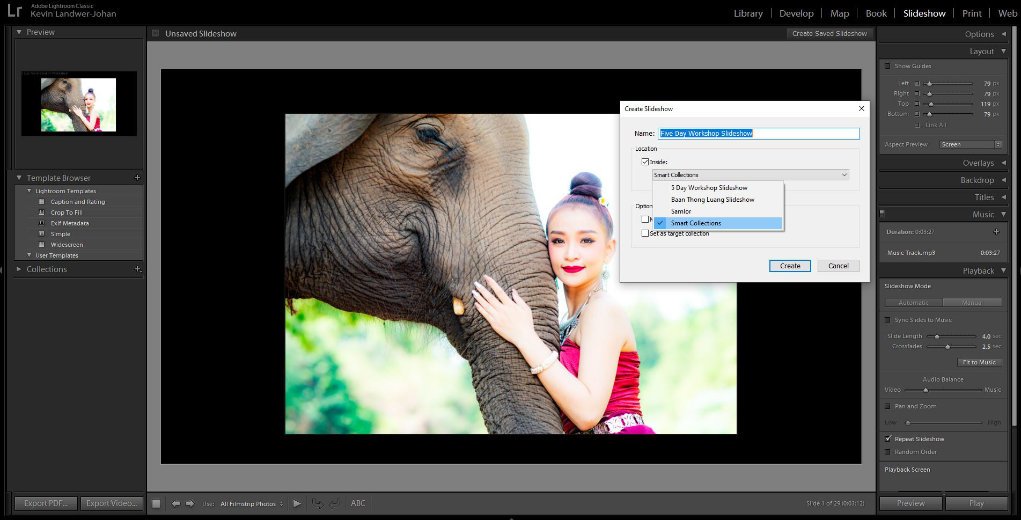
In this window, you also have the option to create virtual copies of the photos used in your slideshow. This will allow you to edit them or add lightroom presets for the slideshow without affecting your original image files.
In the left side panel of the slideshow module, you’ll find some template options. In the template browser, you can choose to use an existing template or build your own and save it for future use. Start with one of the templates lightroom provides. This simplifies this process and you can always customize it as you go through the process.
Having picked one from the template browser you can now preview the slideshow. Do this by clicking the triangle icon at the bottom of the slideshow module or the Preview button on the right, under the playback panel. You will see how your sequence of images look in the template you have chosen.
Customizing Your Presentation in the Slideshow Module
Lightroom gives you lots of scope within the slideshow module to customize how your slideshow will look as you play it back.
Identity Plate
Above the main slideshow module window that displays the first image in your sequence, you will see and identity plate. If you have already created one in lightroom it may be displayed. In the right side panel, you can change or add an identity plate in the Overlays area. Here you’ll see options for what text to use, along with size and color you can choose or your identity plate. You can also choose not to display this.
Options Panel
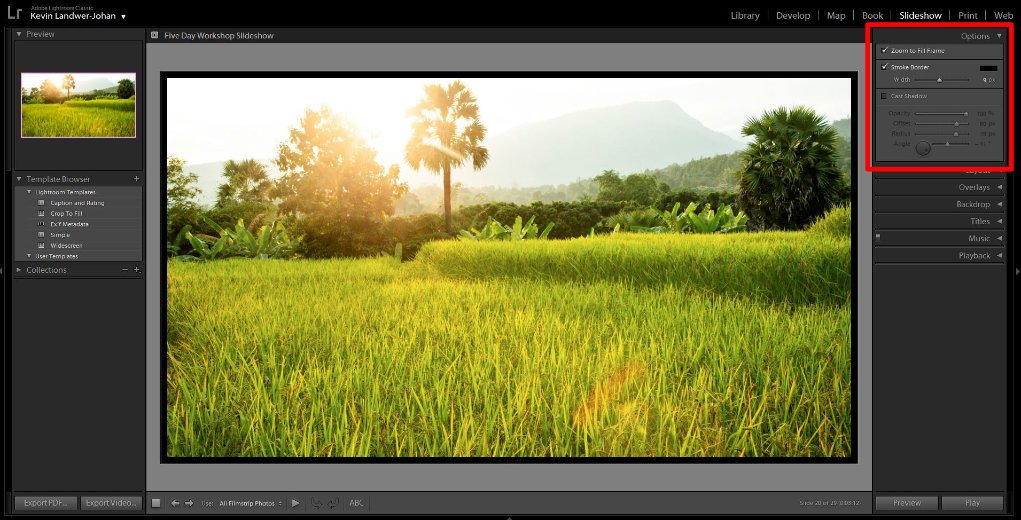
In the Options Panel you can choose how the images in your slideshow will display. Review each of the checkboxes and decide how you want your pictures to look.
You can force the photos to fill the frame, but by doing this you may find your images are cropped. You can add a border or a drop shadow and control the color and size of them.
Layout Panel
In the Layout Panel, you can add space around your photos. With this option, you must be aware that the aspect ratio of your photos will change based on how you control the space. By default, the top, bottom, and sides are linked. You can choose to unlink them and adjust the viewable area to suit how you want it to look.
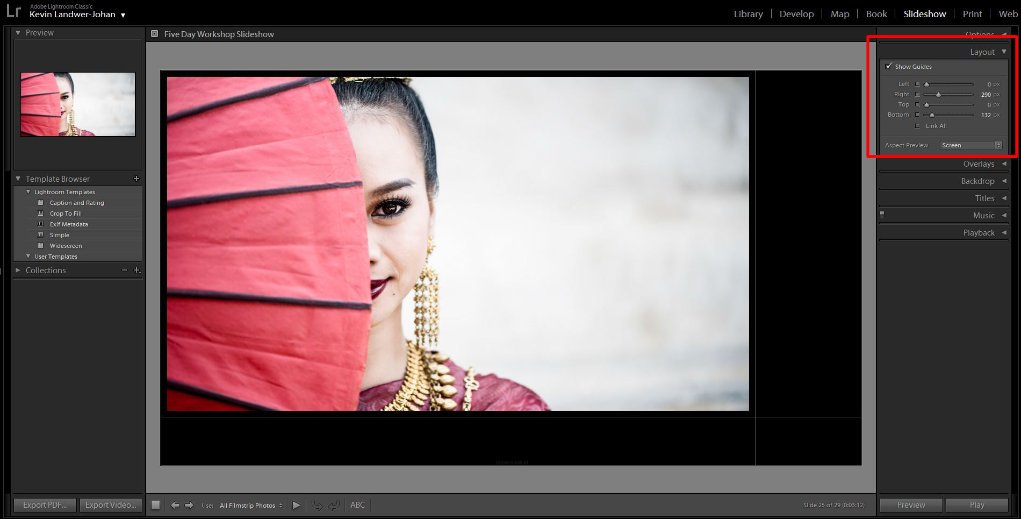
Overlays Panel
In the Overlays panel, you can edit your custom identity plate, choose to include a watermark, ratings, or additional text overlays.
Each of these aspects is customizable. With the text options, you need to click on triangle icons to bring up the window where you can configure them. Here you can adjust size, color, and location of where the text will display.
For each slide, you can add your own text by clicking on the ABC under the main slideshow module window. In the side panel, you can choose the color, font, and opacity. Click and drag on the bounding box around the text to adjust the size and position of the text.
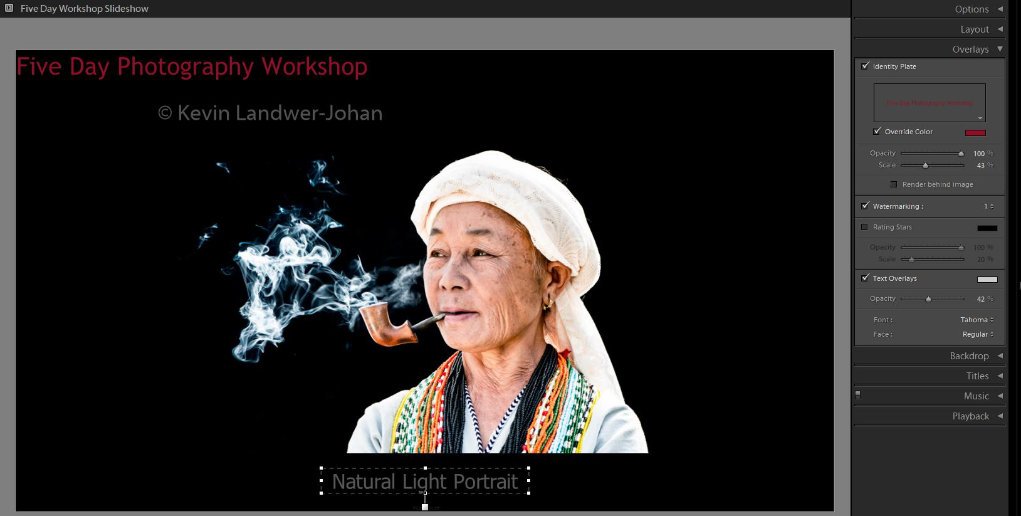
Backdrop Panel
In the backdrop panel you can add a photo or color behind your photos. If you’ve chosen to display your photos to fill the frame (in the Layout Panel) you’ll not see any affect when applying a background.
Click the Color Wash option to add a gradient look behind. Select one color from the color wash and the other from lower down where you see the Background Color option. Leave the Color Wash unchecked to use a single background color.
To add an image behind, click on Background Image and drag and drop the picture you want to use into the panel from the filmstrip. If you can’t see this, press F6. You can control the opacity of this image. You can choose to leave the color options turned on or to remove them so only the image is in the background
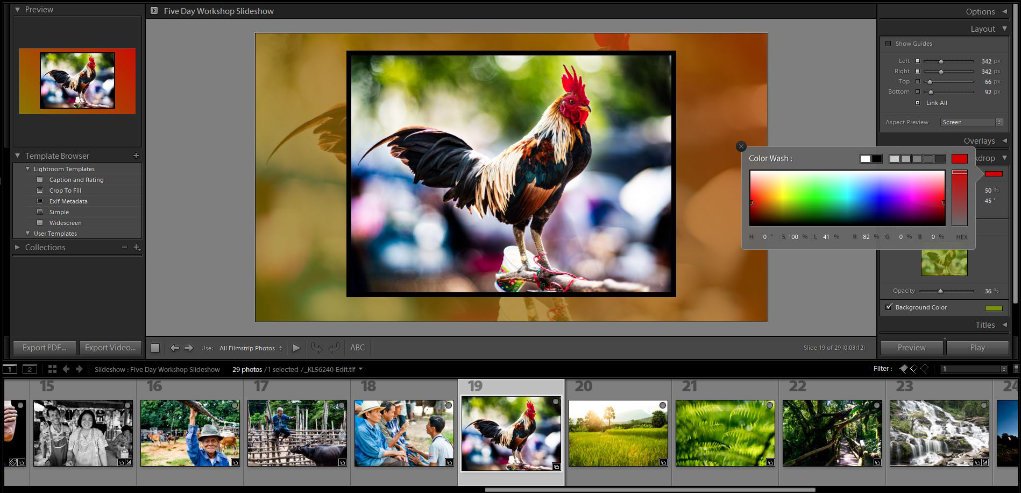
Titles Panel
In this panel, you can add titles that appear at the beginning and end of your lightroom slideshow presentation. You can choose the color, font, and size of the text.
Music Panel
From the Music Panel, you can choose to add music to play with your slideshow. Click on the + icon and select an mp3 file form your hard drive.
Playback Panel
In the Playback Panel, you can control the flow of your lightroom slideshow. You can manage how the slideshow plays back manually or you can sync it if you did add music in the previous step.
In this panel, you can also control the length of the transitions between each photo. You can also control how long each photo stays on screen before the next one appears. This may depend somewhat on where you’ll present your slideshow and the audience you’re targeting with it.
Experiment with these options are they are important to the overall feel of your slideshow. Left to chance, the way your slideshow plays it may not look the best. Try different options, play it back, and see how you like it.

How To Play A Slideshow
Lightroom slideshows are an easy way to share a selection of your images. You can export a slideshow as a video file or as a PDF. Exporting as a PDF you can then incorporate it into a Powerpoint or Keynote presentation. When you’re ready to do this, select the option you prefer from the bottom of the left panel.
Give yourself time to experiment. It’s always good to ensure you present your photos in the best way you possibly can. As you create a few different slideshows, you’ll get a feel for how to curate your images and design great looking presentations.


