
When you edit night photos in Lightroom, you bring a powerful, versatile, and feature-rich program to the task. With know-how and practice, you can create stunning, professional-looking images of the night sky, city streets, or nightscapes.
Night photography is fascinating. A dull concrete bridge takes on a romantic glow in after-hours lighting. The night sky is a vast umbrella of stars. City streets become enchanting corridors. There are color tones, reflections, and moods that only come out at night.
In this article, we’ll discuss a variety of techniques to help you edit night photos in Lightroom. I’m starting with the assumption that you’re familiar with Lightroom. You know how to import raw files, you know your way around the Library and Develop modules, and you’ve used the Basic Panel for some initial adjustments. If that’s not the case, or if you want to review, check our Adobe Lightroom tutorial.
1. Start with Lens Profile
Lightroom allows you to easily enable profile correction for your images. This is a good starting point to help you achieve the most accurate colors and sharpness. Camera and lens profiles are specific to the camera and lens used to capture the image.

In the Develop module, under Lens Corrections, you may see “Built-in Lens Profile Applied.” In this case, Lightroom knows your lens based on the raw file metadata and automatically applies the corrections. If not, you may manually select the Make, Model, and Profile of the lens.
By setting the camera and lens profiles, you make sure that the details and tonal range you captured in the camera will be represented accurately.

Adjust the White Balance in Lightroom
Night images can be tricky. Conditions such as twilight, light pollution, and light from the moon impact the colors.
At the top of the Basic Panel, you’ll find the WB: Temp and Tint sliders. Move the Temp slider to the left, and you get a cooler color temperature. Move it to the right to create a warmer tone. Fine-tune it with the Tint slider to find just the right white balance.
When you edit night photos in Lightroom, don’t overdo it. It is easy to go too far and end up with a garish, unnatural-looking photo.

Adjust Contrast and Exposure
Staying in the Basic panel, adjust the White slider to restore detail in the highlights and to avoid clipping the bright areas. And set the Black point slider to an appropriate level for detail in the shadows.
In addition, fine tune the Contrast slider and Exposure slider to achieve an image that is bold and vivid. Then, make further tweaks to the dark areas with the Shadows slider and the bright areas with the Highlights slider. Again, don’t go overboard with these adjustments, or the result will be too dark or washed out.
2. Customize Hue, Saturation, and Luminance
After adjustments in the Basic panel, move the HSL panel. In this section, eight color sliders control settings for Hue, Saturation, and Luminance. Take care with these settings to maintain a natural appearance of the sky, but look for colors that need a little boost to bring out the full tonal range of night photos.

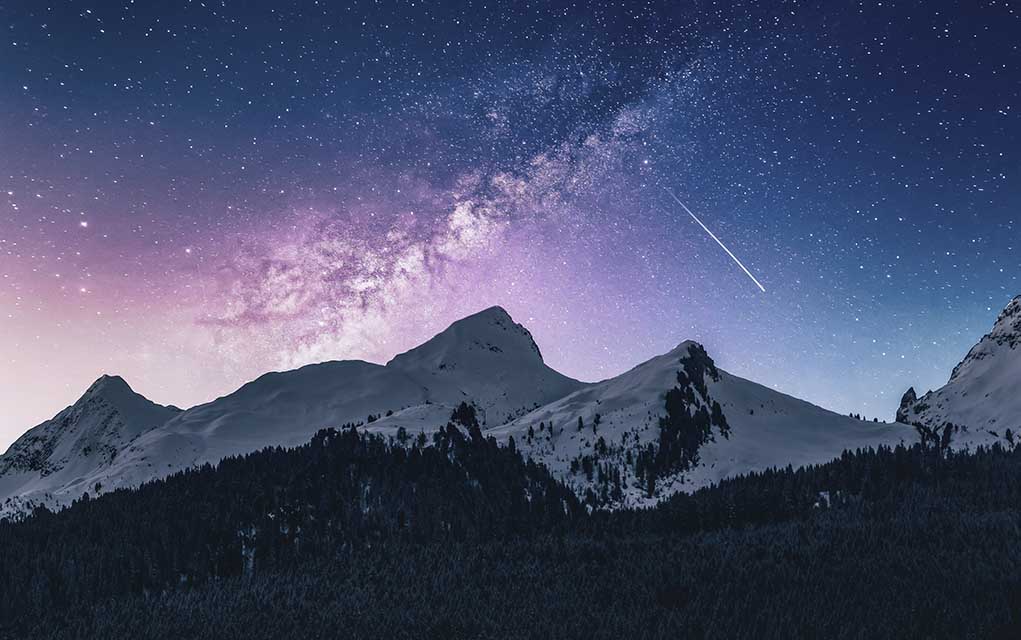
If you are working on a shot of the Milky Way, experiment with the Magenta and Blue sliders and reduce saturation in the Green tones. If you have part of Earth’s horizon in the photo, work with Yellow and Red sliders to capture a natural look that complements the sky.
There is no set formula for these adjustments. Rely on your artistic vision and customize it to your own preference.
3. Sharpen the Image in the Detail Panel
To enhance the details of an image, first of all, zoom in to at least 100 percent so you can see the edge definition.
Amount slider sets the amount of sharpening. Zero indicates no sharpening. Lower values of sharpening lead to cleaner images. So don’t go too far.
Radius determines the size of the edges where sharpening is applied. Images with fine detail need a lower radius setting.
Detail adjusts how the sharpening process impacts edges. Lower settings remove blurring. Higher values make the textures of the image more prominent.
Masking slider: At zero, sharpening is uniform across the entire image. As the number increases, sharpening is restricted to the stronger edges.
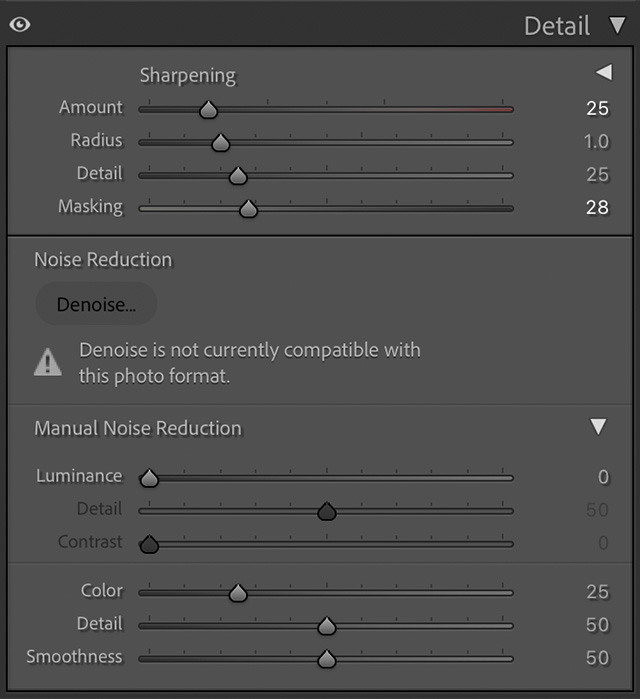
Reduce Noise in the Detail Panel
Night photography often requires a long exposure time, so when you edit night photos in Lightroom, noise may be an issue. Zoom in on the photo to 100 percent, giving you a better view of image noise and the effects of the sliders.
The Luminance slider reduces the amount of luminance noise. This is the primary noise reduction slider.
Detail sets the noise threshold. Used primarily for high noise images. Higher values maintain detail but with a noisier result. Lower settings render cleaner images with some loss of detail.
The Contrast slider is most beneficial for noisy photos. Higher settings add contrast but may result in noisy spots. Lower values produce a smoother image with less contrast.
Color reduces color noise. Don’t push it too far, as it may remove the color that you want to keep.
Detail sets the color noise threshold. Higher settings maintain the thin edges but may leave color blotches. Lower values eliminate the blotches but may result in color bleeding.
Much of what you do in editing night shots is a balancing act. As such, you’re constantly trying to enhance one aspect of a photo while keeping the negative effects of that enhancement to a minimum.
4. Remove Chromatic Aberration
This is a form of distortion that appears as a color border on the edges of high-contrast objects.
Directly below the Detail panel is the Lens Correction panel. If the automatic lens profile didn’t take care of all the chromatic aberrations, set this panel to manual and adjust the Amount sliders to reduce purple and green aberration.
Then, fine tune the Purple Hue and Green Hue sliders to further reduce this anomaly. Move the endpoints to increase or reduce the range of the affected colors.
In this panel, you may also reduce Vignetting. Or, increase it, if that is what you envision.

5. Make Fine Adjustments to Presence
An advantage of Lightroom is the edits are non-destructive, so you can go back to any panel and refine your settings to further enhance the photo.
Presence settings are at the bottom of the Basic panel.
The Texture slider is used to enhance or diminish medium-sized details, affecting the photo’s texture without impacting the finer details.
The Clarity slider influences the contrast of edges in the mid tones. Increasing this setting makes the image pop, appearing sharper. Decreasing it softens the photo.
The Dehaze slider affects the atmospheric elements, such as haze or fog, which lower contrast and obscure details. Move this slider to the right to minimize the haze. Or, especially in night photos, you may want to add moodiness by moving the slider to the left to increase the haze.
The Vibrance slider can increase the saturation of an image; this adjustment preserves colors that are already saturated while boosting colors that are in need.
The Saturation slider enhances or reduces color throughout the entire image and impacts all the colors equally.

6. Apply Local Adjustments in Lightroom
The various panels in the Develop module impact the entire image. However, you may want to change the look of a specific part of the photo. For example, maybe the moon is too bright, and you want to lower the exposure, leaving the rest of the photo as is. Or the bottom half of the image looks too dark, and you want to bring out more detail in that area. These local adjustments are directly under the Histogram.
With Lightroom’s Adjustment Brush and Graduated Filter, you can make exposure and tonal adjustments selectively.
The Adjustment Brush tool can increase or reduce exposure, clarity, brightness, and other elements by “painting” a specific part of the photo.
The Graduated Filter, or gradient tool, can create a similar effect across a larger region of the image. That region can be as wide or as narrow as needed.
The Mask tools utilize Artificial Intelligence to make specific edits to the Subject, Sky, or Background. The masked area appears as an overlay to which you apply changes to Tone, Color, Detail, etc. In addition, you can select People with this tool.

Now, let’s look at some specific types of night photography and how to create dynamic night-time images.
Editing Techniques for Night Sky
There is no one-size-fits-all formula for editing images of the night sky and stars. Allow your personal taste and artistic vision to be your guide.
The Lightroom Tone Curve tool brings out the colors and details of star photos. With Tone Curve, you can set the brightness and contrast for specific areas of the image, such as the brighter stars. With an increase in the contrast and a deepening of the shadows, the stars become more vibrant and detailed against the darker areas.
In addition, adjusting the Color Temperature and Tint sliders brings out the natural tones of the stars and sky.
The Presence Panel is also a valuable tool for night sky photos. But be careful not to use it to excess; a little goes a long way.

Powerful Lightroom Editing Tools for Night Portraits
Lightroom produces dazzling results with night portraits. Crop, adjust luminance and color tones, and add effects to highlight the subject and smooth out the overall appearance.
In the Color panel, adjust Temp for a warmer or cooler mood. Tweak Tint and Vibrance the balance the color tone of the image. Use to Color Mixer panel to fine tune specific colors.
And in the Effects panel, you may want to darken or brighten the photograph’s edges, directing the viewer’s eye to the subject.
If needed, you can return to any of the adjustments for minor changes until you find the result you’re looking for.

Night Street Photography Edits in Lightroom
Photography of nighttime streets can be rewarding with the right tools and techniques. You want to strike a balance between brightness and contrast. Make sure the images are bright enough to reveal details without losing their atmospheric quality.
Experiment with Saturation, White Balance, and Color Temperature to create different moods. Apply the Noise Reduction tools to reduce graininess in the images. Tweak the Clarity slider to enhance wet streets and neon light, and fine tune this effect with the Texture slider. Again, don’t overdo it.
Dehaze is an excellent tool for urban nights. Increasing it can bring out the stark contrasts of the streets while lowering the Dehaze slider can create a moody feeling, with haze or fog softening the image.
In addition, Vignetting works well for night photos that are already dark. Also, add a subtle touch by increasing the Feathering.

Edit Amazing Nightscapes in Lightroom
In spite of the capability of modern digital cameras, we don’t always come away with a finished product. Maybe it’s the camera settings, or maybe it’s the limitations of the sensor. This is where learning to edit night photos in Lightroom becomes indispensable.
Start with a slight boost to Exposure, some added Contrast, and bring up the Shadows a bit. Also, I like to cool down the photo with White Balance; however, you may prefer a warmer tone. It depends on the image and what you want to achieve.
You can boost contrast with Tone Curve. Fix an anchor point among the highlights and boost it slightly. Add a second anchor point at the mid-tones. With a third anchor point in the shadows, lower it a bit. Very slight adjustments to the Tone Curve result in visible changes.
Improve colors in the sky with the HSL tab. Experiment with the Aqua, Blue, and Purple sliders to find just the right tone.
The Color Grading tool is a good way to give the colors a stylized look. With the Shadows wheel, click the center point and drag it to the deeper blue tone. Be careful not to over-saturate.

In Conclusion
Lightroom is a suite of photo editing tools for making basic adjustments and removing flaws. It is loaded with features and tools and is used by many professional photographers; however, it is also a great platform for beginners. At first, Lightroom can be intimidating. Don’t get discouraged. Take it a step at a time and advance your post processing of night photos to the next level.
I hope this article helps you get the best from your night photo editing. With practice, the final result of your night photos will stand out from the crowd.
If you have any comments or questions, please submit them in the space below.


