

How to Get Into Photography: The Complete Guide
Now more than ever, more individuals are thinking of becoming or have become professional photographers. The most straightforward answer to becoming a professional photographer is

Master All Basic Camera Settings: 101 Guide for Beginners
Did you recently purchase a new camera but are not sure which camera settings to use? You’re not alone. Most beginner photographers are initially overwhelmed

Understanding the Exposure Triangle
The exposure triangle is the foundation of photography. An intuitive understanding of exposure is crucial for advancing in the art of photography.

What is Aperture? An Introduction Lesson
Aperture in photography is a diaphragm in lenses that controls the amount of light that can enter the camera. This function works in a similar

What is Shutter Speed in Photography? Basic Guide for Beginners
ContentsWhat is Shutter Speed?How is Shutter Speed Measured?Mechanical Operation of a ShutterHow to Set Your Shutter Speed?Determining Shutter Speeds in PhotographyCamera Shutter Speed ExerciseTips for
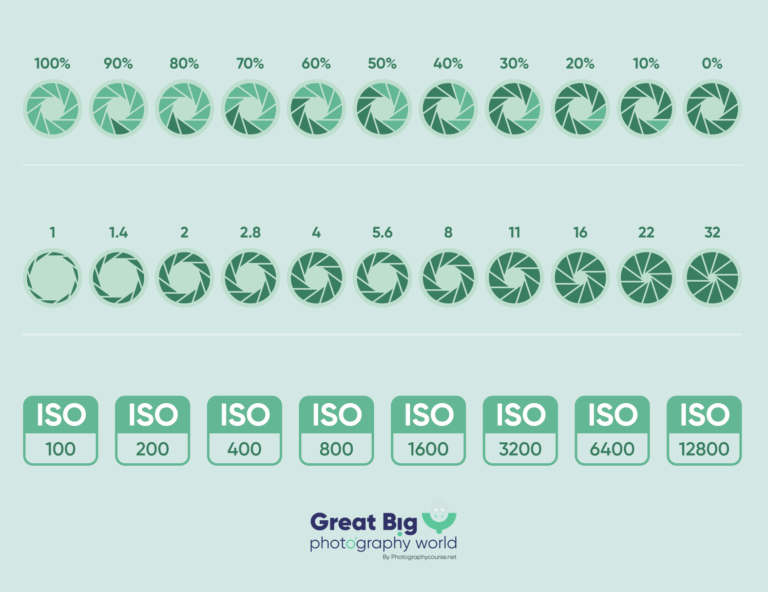
What is ISO in Photography?
The acronym ISO refers to the International Standards Organization. This gives us absolutely no clues as to how it is relevant in photography. The ISO

What is Digital Noise and How to Reduce It
Noise in photography is a complex issue that needs to be addressed, especially as you enter the professional arena. Managing noise in your photos often involves a combination of capturing the lowest noise possible in-camera and making further reductions to noise levels in post processing. Learn more in our detailed step by step guide.
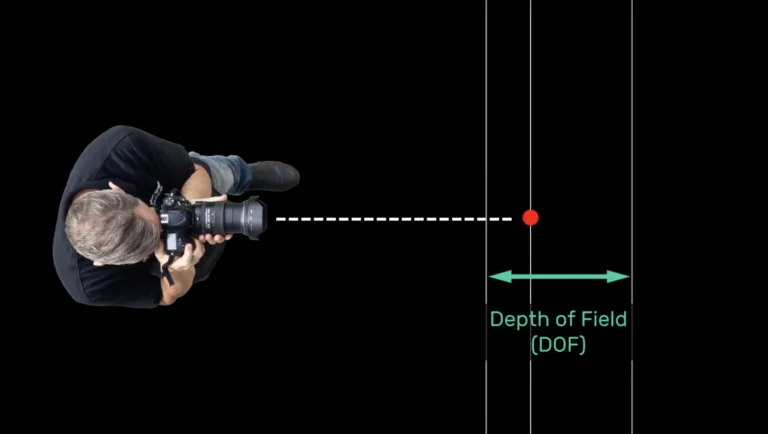
Depth of Field: What is it and How to Use it?
The term depth of field is common photography jargon. It refers to the part of a photo that is in acceptably sharp focus. The range

Understanding White Balance in Photography
Did you know that light can be colored? Not only LED, neon, or fluorescent lights, but natural daylight can have a distinct color cast. This

Understanding Color in Photography: Full Guide
Color in Photography The definition of color is a component of light that is separated when it is reflected off of an object. Color begins

Contrast in Photography – How to Make the Best Use of It
The contrast in photography comes in a few different forms. How you make use of it is well worth considering. Contrast, or lack of it,

Understanding Tonal Range in Photography
Can’t wrap your head around the concept of tones in photography? Our comprehensive guide on tonal range is just for you!

Understanding Digital Camera Modes
Digital camera modes are often misunderstood and an area of confusion for many new photographers. This article takes you through the basic camera modes.

How to Shoot in Manual Mode
Manual camera settings may be challenging for beginner photographers. In my opinion, shooting in manual mode with your camera is a great way to learn

Camera Metering Modes Explained
Knowing how and when to use which metering mode can initially be a bit confusing. You can learn about the various modes in this article.

Focus Modes: When and How to Use Them
Looking to master focus and composition? Level up your skills with this in-depth focus modes guide for digital photography!

What is Exposure in Photography?
In photography, your exposure determines what gets recorded on your camera’s image sensor. The science behind exposure in photography is called Sensitometry. Getting the right

How Do You Know if You Have a Correct Exposure?
Setting the right exposure is foundational to good photography. But what is a correct exposure? A well-balanced exposure is one that you are happy with.

Exposure Compensation: How to Use it Correctly
Pick up a digital camera nowadays and one of the things you’ll instantly notice is the Exposure Compensation on the menu screen. It’s a strange-looking

22 Essential Photography Composition Rules
A comprehensive look at the rules of photography composition with photo examples and how to apply these rules.

What is the Rule of Thirds and How to Use it in Photography?
If you’re new to art or photography, the Rule of Thirds is a helpful basic composition technique so you can create compelling images. Even though

How To Use Negative Space to Make Your Photos More Powerful
Carefully thought-out photography compositions often incorporate negative space in their design. Photographers who make use of negative space add power and meaning to subjects that

How To Use Leading Lines in Photography
Knowing how to use leading lines in photography is one of the key composition skills beginner photographers can acquire. Learning composition starts with an understanding

How to Use Strong Lines in Photography Composition
Making use of strong lines in photography compositions creates strength, adds peace, guides a viewer’s eye, and much more. You have to be aware of

9 Reasons Why Your Photos Are Blurry
No photographer likes to see that their photos are blurred. Wondering ‘why are my pictures blurry’ is the cause of much frustration. The good thing

10 Common Beginner Photography Mistakes & How to Avoid Them
It’s inevitable for beginners to make photography mistakes. Here’s our detailed guide to help you overcome all the errors!

RAW vs JPEG – Which Image File Format is Better?
RAW format and JPG (or JPEG) format are two distinctly different file types produced by your digital camera. When you set up your camera, you

10 Different Types of Cameras
From DSLRs, mirrorless cameras to the iPhone, it’s easier than ever to find a digital camera and start taking great photos. We’ve compiled a list

How to Choose a Camera: 9 Questions to Ask
Choosing a camera can be challenging. Here’s a series of questions to help you decide which is the best camera for you.

Mirrorless vs DSLR Cameras: Which One is Best for You?
A detailed look at mirrorless vs DSLR cameras, pros and cons of each, and which is best for you.

How to Use a DSLR Camera: Basic Guide for Beginners
Learning to use your camera is on the mind of every new photographer who has one. These cameras are complicated pieces of technological equipment. If

How to Hold a Camera Steady to Take Sharper Photos: 7 Pro Tips
So learning to hold a camera may sound a bit silly at first. But think about it, have you ever considered if you are holding

6 Types of Camera Lenses & What to Do With Them
Basic Types of Camera Lenses Do you have a camera lens FOMO? We’ll break down the types of camera lenses out there and how can

Understanding Focal Length and Angle of View
Understanding focal length helps photographers determine what lenses to invest in and which lens to use on a particular shoot. Focal length describes one of

How to Choose the Right Camera Lens: Guide for Beginners
With so many options, choosing the ideal camera lens for your style and type of photography may leave you feeling overwhelmed. How do you find the right one?

How to Use These 13 Types of Lighting in Photography
Lighting is the most important consideration in photography. It’s what makes the photograph possible. So, let’s get a better understanding of what we are talking

How to Avoid Making Bad Lighting Mistakes
Good lighting is essential to good photography. Bad lighting mistakes can ruin an otherwise fabulous photograph. This is frustrating for any photographer. Learning how to

51 Types of Photography Genres and Styles
Photographers around the world practice a wide range of photography genres and styles. Each offers a unique perspective and creative approach to capturing images.

How To Make Extraordinary Photography from Ordinary Subjects
A good subject does not make a good photograph. Nor does a good camera. Good photographers make good photographs. Ordinary subjects and ordinary cameras can

How to Analyze a Photograph (4 Simple Steps)
Analyzing a Photograph Learning to analyze a photo requires introspection and self-analysis. Whether is a photo you have taken or one taken by another photographer.

Personal Photography Projects: 13 of the Best Ideas
Working on a personal photography project is one of the best ways to help you improve your photography. Being focused on a particular topic, you

A Glossary of 251 Most Essential Photography Terms
Photography terms are numerous and can be super confusing for new photographers to get their heads around. But having a good understanding of the photography